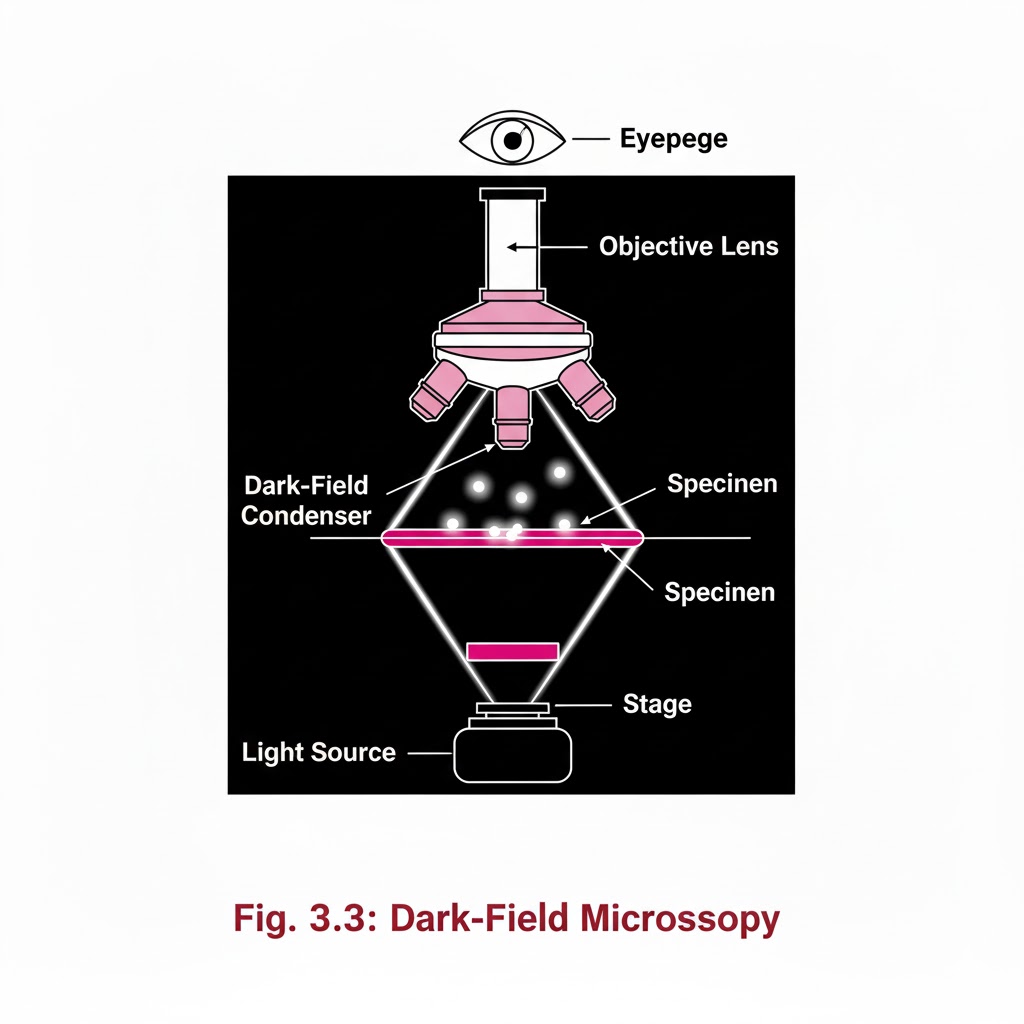
Histopathology

Histopathology

RECEIVING OF SURGICAL SPECIMENS

INTRODUCTION:- In the laboratory setting, numerous histological specimens are received throughout the day for testing. It is important to maintain a systematic approach to ensure that all samples are accounted for and are being received and tested appropriately. Without it, there is a potential to misplace or lose samples. OBJECTIVES:-After reading this lesson, you will be able to:- *explain the process of receiving surgical specimens *describe preparation of gross room *receive the samples, label the sample and store.  RECEIVING OF SURGICAL SPECIMENS:- At the time of receiving the specimens, following points should be checked and  these points must match between requisition form and label on the sample container. 1. Name of the patient 2. Sex and age of patient 3. Registration no, OPD or indoor number 4. Type of sample like appendix or lymph node. After matching the above points carefully, accession number of the Histopathology laboratory should be given on the requisition form and on the sample container like it has been depicted in the form and sample bottle. A register should be maintained for record and for future reference Following points should be noted on the register (sample given) 1.Date 2.Accession number which was given by the pathology department. 3.Patients name, age, sex. 4.Patients registration number/ OPD/ indoor number. 5.Type of sample. 6.Number of samples received from one patient. 7.Remarks / final diagnosis which may be entered later on. After receiving the samples the consultant should be informed for grossing. If grossing to be done after some time, fixative should be put in all the samples to prevent autolysis of the specimen. PREPARATION OF GROSS ROOM:-   The routine work associated with a surgical pathology specimen includes gross and microscopic examination. Proper preservation of tissues and processing of the tissue are the most important aspects for correct diagnosis. The size and features of the gross room depends on the number of specimens and type of institution. Gross room should be well illuminated and ventilated.It should have a gross station and racks to keep the specimen in order of accession number.        Gross station – It should have ventilated hood. 1. Cutting board placed inside the metal box designed in such a fashion that all the fluids should flow directly into the sink 2. Ready access to sink with hot & cold water 3. Formalin – stock and 10% buffered formalin 4. Box of instruments containing                 (a) Scissors                                                     (b) Forceps                                                     (c) Malleable probe                                       (d) Scalpel handle with disposable blades (e) Long knife                                                      (f) Scale                                                            (g) Pins for attaching the specimens to corked surface if required 5. Containers with different fixatives 6. Bone cutter 7. Large disposal bin 8. Box with cassettes and labels These are the essential items. Depending upon the pathology service being rendered to the institution more sophisticated items may be added. Apart from the above items following items may be of help in keeping the records 1. Photographic facility                                   2. Refrigerator                                                  3. Balance to weigh the gross specimen     4. X-ray view box 5. Other equipments for tissue bank facility.

Histopathology, Uncategorized

special light microscope

Introduction:- Microscopes are instruments designed to produce magnified visual or photographic images of objects too small to be seen with the naked eye. Themicroscope must accomplish three tasks: produce a magnified image of the specimen, separate the details in the image, and render the details visible to the human eye or camera  Compound microscopes are suitable for examination of stained preparations. For some other special conditions we need special microscopes like Dark-ground, phase contrast, polarizing and immuno fluorescence microscopes. OBJECTIVES:-After reading this lesson, you will be able to:                                                     *describe the principle of Dark-ground, phase contrast, polarizing and immunofluorescence microscopy.                  *explain the uses of Dark-ground, phase contrast, polarizing and immunofluorescence microscopy. DARK GROUND ILLUMINATION:-                      Conditions arise when specimen need to be visualized as unstained or living cells. Since such specimens have refractive indices close to medium in which they are suspended, bright field microscopy is difficult as there is not much contrast. Principle:- Dark ground microscopy prevents direct light from entering the front of the objective, only light which enters is which gets reflected or diffracted by the specimen, thus making them appear bright in a dark background . Uses of Dark ground microscopy::- Useful for spirochaetes, flagellates, cell suspensions, flow cell techniques, parasites, autoradiography, and fluorescence microscopy. Disadvantage: Resolution is inferior to bright field microscopy. Does not reveal internal details PHASE CONTRAST MICROSCOPY:- Unstained and living biological material viewing by bright field and dark ground illumination has problems of reduced illumination and resolution. To overcome these problems, phase contrast microscopes are used. Principle: It is an optical microscopy illumination technique that converts phase shifts in light passing through a transparent specimen to brightness changes in the image. The phase shifts themselves are invisible to the human eye, but become visible when they are shown as brightness changes. A practical implementation of phase-contrast illumination consists of a phase ring (located in an aperture plane located somewhere behind the front lens element of the objective) and a matching annular ring, which is located in the conjugate primary aperture plane Two selected light rays, which are emitted from one point inside the lamp’s filament, are focused by the field lens exactly inside the opening of the condenser annular ring. Since this location is precisely in the front focal plane of the condenser, the two light rays are then refracted in such way that they exit the condenser as parallel rays. Assuming that the two rays in question are neither refracted nor diffracted in the specimen plane (location of microscope slide), they enter the objective as parallel rays. Since all parallel rays are focused in the back focal plane of the objective, the back focal plane is a conjugate aperture plane to the condenser’s front focal plane (also location of the condenser annulus). To complete the phase setup, a phase plate is positioned inside the back focal plane in annulus Uses: It’s a quick and efficient way of examining unstained paraffin, resin and frozen sections, studying living cells (cell cultures) and their behavior. POLARIZED LIGHT MICROSCOPY:- Light can be described as an electromagnetic vibration where there are many planes of vibration. Natural light vibrates in many planes or directions, whereas polarized light vibrates in only one plane. It can be produced by passing light through a polarizer. Substances capable of producing polarized light are called birefringent. Principle: The dedicated polarizing microscope uses two polarizers. One, always referred to as polarizer, is placed beneath the substage condenser. The other is called analyzer and is placed between the objective and the eyepiece. Looking through both polarizers, the light intensity is best when they are both giving light vibrating parallel to each other. However, when the light vibration is at right angles to each other, there is dark background. If a substance capable of birefringence is placed between the two polarisers it gets visualized as brightness against a black background. Uses: Medicine-Amyloid detection, collagen fibers, urates and other crystals.Metallurgy, Ceramics. FLUORESCENCE MICROSCOPY:- Principle: Fluorescence is the property of some substances which, when illuminated by light of a certain wavelength, will re-emit the light at a longer wavelength. In fluorescence microscopy, the exciting radiation is usually ultra violet wavelength or blue region. A substance which possesses a fluorophore will fluoresce naturally (Primary or autofluorescence) eg Vitamin A, chlorophyll Dyes, chemicals and antibodies added to tissues produce secondary fluorescence of structures and are called fluorochromes. When antibodies labeled with fluorochromes are used to detect particular antigens, the technique is called Immunofluorescent technique and is widely used in medicine. Tissue antigens most commonly demonstrable by Immunofluorescence are viruses, protozoa, bacteria, enzymes, hormones, plasma proteins, cells and cell constituents. Examples of fluorochromes: Fluorescein (apple green emission color), Rhodamine (Orange-red color

Histopathology

Light microscope

Introduction:- Microscopes are instruments designed to produce magnified visual or photographic images of objects too small to be seen with the naked eye. The microscope must accomplish three tasks: produce a magnified image of the specimen, separate the details in the image, and render the details visible to the human eye or camera. This group of instruments includes not only multiple-lens (compound microscopes) designs with objectives and condensers, but also very simple single lens instruments that are often hand-held, such as a loupe or magnifying glass Objective:- After reading this lesson, you will be able to: *describe the principle of light microscope *explain the parts of a light microscope *learn how to use a microscope. LIGHT AND ITS PROPERTIES:- Light radiates in all directions, with each ray traveling straight till infinity, unless Amplitude:- refers to the strength of energy or brightness of light. When light passes through any medium, the amplitude decreases depending upon the medium. Wavelength:- The distance between the apex of one wave and the next is the wavelength and measured in nanometers, and determines the color. Retardation:- Media through which light is able to pass, will slow down the speed of light (proportionate to density of medium). Refraction:- If light enters a medium (eg glass) at an angle, a deviation of direction occurs Image Formation .                                                                                                                                       Focal point:- Parallel rays entering a simple lens are brought together to a single point called focal point, where a clear image will be formed. Conjugate foci:– Object placed at one end of lens will form a clear image on a screen kept at other side of lens. Conjugate foci vary in position. If object is nearer the lens, the image will be formed further away, at a greater magnification and inverted. This “real” image is formed by objective lens of microscope. If the object is placed within focal point of lens, image is formed on same side as object, is enlarged, right way up and cannot be projected on a screen, this is the “virtual image”. The eye piece of microscope forms this image Image Quality:- As white light is composed of all spectral colors, different wavelengths will be refracted to different extent. This lens defect is called chromatic aberration.Spherical aberration is caused when light rays entering at a periphery are refracted more than those entering the centre of lens. Both these faults can be corrected by using combination of lenses and lens elements. COMPONENTS OF A MICROSCOPE:- Light source:- Light source can be external or inbuilt. Dispersal of heat, collection of greatest amout of light, direction and distance are carefully calculated by the designers of microscope for greatest efficiency.   Condensers:-                                                                                      The purpose of condenser is to concentrate the light into the plane of the object. The more the light at the specimen, better is its resolution. All condensers have aperture diaphragm with which the diameter of the light beam can be controlled.                Object stage :-                                                                                    It is a rigid platform with an aperture through which the light can pass. It supports the glass slide. It allows controlled movement in two directions.                                                   Objectives :-                                                                                           They are the most important parts of microscope. The main task of objective is to collect the maximum amount of light from the object, unite it and form a high quality magnified real image. Magnifying powers of objectives are from 1:1 to 100:1.                                                                                               Body tube:- Body tube can be monocular, binocular and the combine photo-binocular (also called trinocular). Binocular tubes have provision for inter-pupillary distance adjustment, enabling each observer to adjust for his eyes.                                                            Eyepiece:-                                                                                             The final stage in optical path, the eyepiece’s function is to magnify the image formed by the objective within the body tube, and present the eye with a virtual image.                                           Use of the Microscope:-                                   

Histopathology, Uncategorized

Introduction of histopathology

Introduction:- Surgical pathology includes gross and microscopic examination of resected specimens and biopsies by histopathologists for tissue diagnosis. Several steps are followed to get the tissue in a form, by which diagnosis can be made under light microscope Objective:- After reading this lesson, you will be able to: list the steps involved in the processing of surgical specimens for histopathologic examination explain the after care of the specimens explain grossing and gross room describe the laboratory hazards and safety measures. Steps involved in the process are 1. Receipt of specimens from OT 2. Grossing 3. Tissue processing 4. Embedding 5. Section cutting 6. Staining and labelling 7.   Dispatch of slides to pathologist for diagnosis

Histopathology

Fixation in Histopathology: Types, Techniques, and Fixatives Explained

Primary aim: preserve the morphological and chemical integrity of the cell in as life-like manner. – Shape, structure, intercellular relationship and chemical constituents of tissues are preserved. – Prevents degeneration, decomposition, putrefaction, and distortion of tissues after removal from the body. Secondary goal: harden and protect the tissue from the trauma of further handling MAIN FACTORS INVOLVED IN FIXATION: Hydrogen Ion Concentration – pH 6 and 8 . Temperature – Formalin heated at 60C Thickness of section – 2cm queb for light microscopy Osmolality – slightly hypertonic Concentration – low conc. of glutaraldehyde Duration of fixation – 2-6 h in buffered formalin EFFECT OF FIXATIVES harden soft and friable tissues make the cells resistant to damage and distortion inhibit bacterial decomposition increase optical differentiation of cells and tissues act as mordants or accentuators reduce the risk of infection CHARACTERISTICS OF A GOOD FIXATIVE Cheap Stable Safe to handle Kills the cell quickly producing minimum distortion of cell constituents. Inhibit bacterial decomposition Produce minimum shrinkage of tissues Harden tissues making cutting sections easier Isotonic, causing minimal physical and chemical alteration of the cells and their constituents. Make cellular components insoluble to hypotonic solutions TYPES OF FIXATIVES :- 1. According to composition : A. Simple Fixative – made up of only one component substance such as- Formaldehyde ( Most used fixative), Glutaraldehyde, Mercuric Chloride, Potassium dichromate, Chromic acid , Picric Acid, Acetic Acid, Acetone ,Alcohol, Osmium tetra oxide etc. B. Compound Fixative – made up of two or more fixatives such as Zenker’s solution, Bouins Fluid etc. 2. According to Action A. Microanatomical Fixatives – permits the general microscopic study of tissue structures such as 10% Formol Saline 10% Neutral Bufered Formalin Heidenhain’s Susa Formol sublimate Zenker’s solution Zenker formol Ouin’s solution Brasil’s solution B. Nuclear Fixative – Preserve nuclear structures such as, Flemming’s fluid Carnoy’s fluid Bouin’s fluid Newcomer’s fluid Heidenhain’s Susa C. Cytological Fixatives – preserves cytoplasmic structures such as, Flemming’s fluid without acetic acid Kelly’s fluid Formalin with “post-chroming” Regaud’s fluid (Muller’s fluid) Orth’s fluid Histochemical Fixatives – preserve chemical contents of cells and tissues such as   D. LIPID FIXATIVE – Mercuric chloride and Potassium dichromate PHOSPHOLIPIDS FIXATIVE – Baker’s formal calcium CARBOHYDRATE FIXATIVE – Alcoholic formaldehyde PROTEIN FIXATIVE – Neutral buffered formal saline or formaldehyde GLYCOGEN FIXATIVE – Rossman’s fluid or absolute alcohol Composition, Advantage, Disadvantage & Use of Fixative Formaldehyde – A. 10% formaline widely used (10% formalin) Disadvantage – fumes are irritating to the nose and eyes prolonged storage may induce precipitation of white paraformaldehyde Notes –   Removal of precipitate is addition of 10% methano B. 10% formol – Saline – – 40% Formaldehyde + NaCl + Distilled water fixation of CNS Tissues and General post-mortem tissues preserves enzymes and proteins C. 10% Neutral Buffered Formalin/Phosphate-Buffered Formalin – Sodium dihydrogen phosphate + Disodium hydrogen phosphate + 40%Formaldehyde + Distilled water Preservation of surgical, post-mortem and research specimens Best fixative for iron-containing tissues D. Formol-Corrosive (Formol Sublimate) Aq. Mercuric Chloride + 40% Formaldehyde Routine post-mortem tissues Excellent in silver reticulum methods Fixes lipids, especially neutral fats and phospholipids E. Alcoholic Formalin (Gendre’s Fixative) 95% Ethyl Alcohol saturated with picric acid + Strong formaldehyde solution + glacial acetic acid. Immunoperoxidase studies on tissues Used for rapid diagnosis Good for preservation of glycogen and for micro-incineration Used to fix sputum, since it coagulate mucus F. Glutaraldehyde two formaldehyde residues linked by 3C chains used for enzyme histochemistry and electron microscopy preserves plasma proteins 2. METALLIC FIXATIVES   A. MERCURIC CHLORIDE Mercuric Chloride + Potassium Dichromate + Sodium Sulfate + Distilled Water most common metallic fixative Tissues fixed with mixtures containing mercuric chloride (except Susa) contain black precipitates of mercury. Routine fixative of choice for preservation of cell detail in tissue photography. Renal tissues, Fibrin, Connective tissues and muscles Black deposits may be removed by adding saturated iodine solution in 96% alcohol, the iodine being decolorized with absolute alcohol in the subsequent stages of dehydration. B. Zenker’s Fluid Mercuric Chloride + Glacial Acetic Acid fixing small pieces of liver, spleen, connective tissue and nuclei may act as mordant Mercuric deposits may be removed by immersing tissues in an alcoholic iodine solution. “de-zenkerization” C. Zenker-formol (Helly’s solution)   Mercuric chloride + Potassium dichromate + Sodium sulphate + Distilled water + Strong formaldehyde (40%) Fixative for pituitary gland, bone marrow and blood-containing organs such as spleen and liver. Preserves cytoplasmic granules Brown pigments are produced if tissues are allowed to stay for more than 24 hours. Pigments can be removed by immersing the tissue in saturated alcoholic picric acid or sodium hydroxide   D. Heidenhain’s Susa Solution   Mercuric chloride + Sodium chloride + Trichloroacetic acid + Glacial Acetic Acid + Formaldehyde (40%) + Distilled water tumor biopsies especially of the skin Excellent cytological fixative Mercuric chloride deposits may be removed by immersion on alcoholic iodine solution the tissue should be transferred directly to a high-grade alcohol, to avoid undue swelling of tissues caused by treatment with low-grade alcohol or water. E. B-5 Fixative Distilled water + Mercuric Chloride + Sodium acetate Commonly used for bone marrow biopsies

Scroll to Top