Author name: laxmienterprisesjnp@gmail.com

Clinical Pathology

Cerebrospinal fluid (CSF) examination

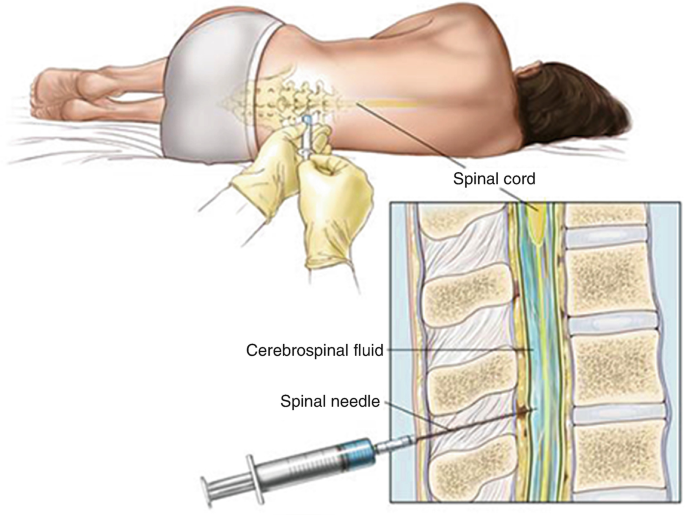
Cerebrospinal fluid(CSF):- CSF are produced by the choroid plexus of the lateral, third, and fourth ventricles up to 80% approximetly and 20% CSF are produced by the surface of brain and spinal card. CSF is a clear, colorless, sterile fluid that fills the ventricles of the brain, the central canal of the spinal cord, and the subarachnoid space surrounding the brain and spinal cord.  CSF produced about 500 mL per day, although only about 150 mL is present at any given time because it is continuously reabsorbed into the bloodstream through the arachnoid villi and granulations. CSF circulates through the ventricular system and around the central nervous system, forming a protective fluid environment for neural tissues. CSF performs several essential physiological functions. It acts as a mechanical cushion,  shocks absorbing and protecting the delicate brain and spinal cord from trauma. It provides buoyancy, reducing the effective weight of the brain.CSF also helps maintain chemical homeostasis The CSF examination or dignosis is important for diagnose infections such as Meningitis and Encephalitis, inflammatory disorders such as Multiple Sclerosis, hemorrhages, malignancies, and other neurological conditions. CSF acts as a mechanical cushion for the brain and spinal cord, absorbing shocks and protecting them from injury caused by sudden movements or impacts. CSF collection :- SF collection is the procedure of obtaining a sample of cerebrospinal fluid (CSF) for laboratory examination to diagnose diseases.The most common method of CSF collection is lumbar puncture (spinal tap).The lumber puncture is done by expert physician , surgeon & Nurses. Procedure for CSF collection:- 1.The patient is usually placed in a lateral decubitus (side-lying) or sitting position. 2.Cleaning the skin and administering local anesthesia. 3.A sterile spinal needle is inserted into the subarachnoid space between the L3–L4 or L4–L5 vertebrae,below the end of     the spinal cord. 4.The needle enters the subarachnoid space, CSF flows through the needle and is collected into sterile tubes. 5.Specimen centrifuged. then the supernatant part used for biochemical tests and the sediment is used for weight mount preparation ,gram’s staining , etc. Physical examination of CSF:– It consist of following examination:- 1.Odour:- CSF are odourless normally in few of bacterial infection conditions putrified small occures. 2. Colour:- Colourless but in bacterial menengitis & physical damage causes redish colour CSF. 3.pH:- Normally pH of CSF is 7.35 – 7.4. 4.Volume:- In adults 120-150 ml CSF are flow in around the spinal card & brain,In child 80-120 ml CSF and neonate 10-60 ml.The produced rate of CSF is 500 ml per day. 5.Specific gravity:- Normal specific gravity  1.003-1.008. 6.Appearence:- Normally CSF are clear but in bacterial menengitis. its may cloudly or Frankly purulent.(Frankly- clear or clean, purulent-containing pus.). Chemical examination:- CSF Sugar GOD/POD Methods:-  Aim:– Performed CSF sugar test by GOD/POD (Glucose oxidase & peroxydase) method. Principle:-      1.      Glucose + H₂O      Glucose Oxidase           Gluconic acid +H₂O₂     2.      H₂O₂  +   4AAP(Aminoantipyrine) + Phenol    Peroxidase       Quinoneimine dye. 1. Take a three clean and dry test tube and mark as blank standerd and test. 2.Measures all contents according to chart. 3.Mixwell and incubate for 10 minutes at 37 degree celcious temperatures. 4. Read the optical density of the test and standered against blank.at500-520 nm wave length.  Calculation:- CSF glucose calculation =               OD of test               ×  Concentration of Standard                                                                                                                                                                                                 OD of standered Concentration of Standard       = 100 mg/dl Result:-…………….? Normal Value:-                                60-80 mg/dl Clinical significance:- Decreased CSF Glucose (Hypoglycorrhachia):-     Microorganisms and inflammatory cells consume glucose, lowering its concentration in CSF in condition      Bacterial meningitis,tuberculous meningitis, fungal meningitis , malignant infiltration of the meninges,severe CNS inflammation. Increased CSF glucose(hyperglycemia):- CSF glucose generally rises in proportion to blood glucose levels.hyperglycemia (Diabetes mellitus).                                            -:CSF Microprotein:- Aim:-  Performed CSF protein by biurate methods. Principle:-  CSF protein + Cu2    Alkaline medium      Violet color complex (Cu-Protein Complex) Requirment:- Test tube, micro-pepette,D/W , calorimeter, CSF sample, working reagen , incubator, tissue paper. 1. Take three clean and dry test tube and mark as blank standerd and test. 2.Measures all contents according to chart. 3.Mixwell and incubate for 5 minutes at 37 degree celcious temperatures. 4. After incbation measure and read the optical density of the test and standered against blank at 540 nm wave length. Calculation:- CSF protein =               OD of test      ×  Concentration of Standard                                                                                                                                                                                                         OD of standered Concentration of Standard    = 6 mg/dl Result:-.………………………? Normal value:-               15-45 mg/dl Clinical significance:- CSF microprotein estimation helps diagnose neurological disorders. Increased CSF protein is observed in meningitis, tuberculous
Clinical Pathology

SEMEN ANALYSIS PRACTICALE

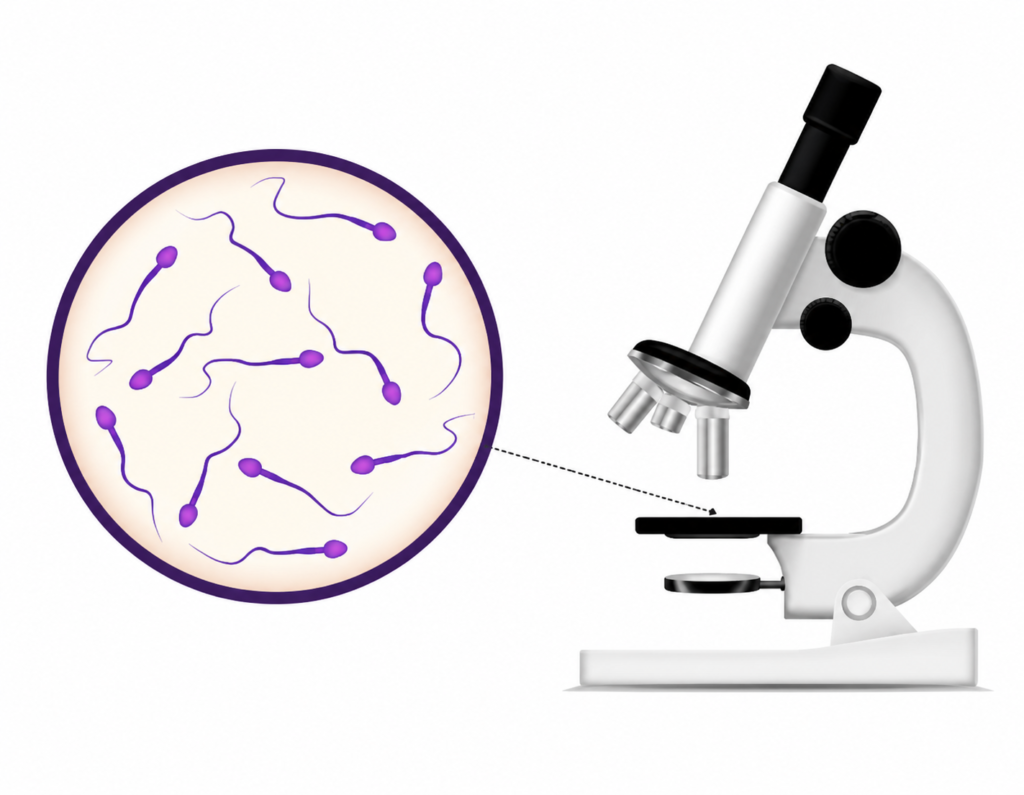
Semen analysis:- Semen analysis is performed to evoluvate male firtility and reproductive health assessing the quality and quantity of sperm in a semen sample. Semen examination is an inexpensive test used for the infertility ,success of vasectomy and medicolegal  cases,hormonal imbalances, infections, lifestyle factors, or exposure to certain medications and environmental toxins. semen analysis consist of following steps. 1.Rutine analysis:- Routine Analysis of Semen is a laboratory test performed to evaluate the physical, microscopic, and functional characteristics of semen. The examination includes assessment of semen volume, color, viscosity, liquefaction time, pH, sperm concentration (count), motility, morphology , and the presence of other cells such as white blood cells or immature germ cells. process included:- 1.Sample collection 2.physical examination  3.Chemical examination 4.Microscopic examination  1.Sample collections:-  A semen specimen should be collected after 3-7 days  of sexual absentees for accurate results.The sample is usually obtained by masturbation directly, the specimen is collected in a clean, sterile, wide-mouth ,leak-proof container provided by the laboratory or properly washed dry condom.then specimen submitted in a laboratory. After collection, the specimen container properly labeled with the patient,s name ,date ,and time of collection. sample should be allowed to liquefy at room tempreture. 2.Physical examination or Gross examination:- The physical examination of semen is the first step in routine semen analysis.its consist following aspect. 1.Volume:- Volume in a single ejaculation approximately 2.5-5 ml semen passed ,the volume is slightly more in patient of infertility. The volume dose not various with the periods of absenties in increase volume of semen is known as hyperspermia and low  volume is caused hypospermia. 2.colour:-Normally it is whitish ,gray white of slightly yellowish or milky.Yellowish or reddish discoloration may indicate infection or blood contamination. 3.pH(power of hydrogen ):- The normal pH  is 7-8.it is slightly alkaline in nature. 4.Viscosity :- During the ejaculation semen are viscus ,when ejaculation falls drop by drop . 5.Liquification:- Liquification occur because of presence of fibrinogen ,normally liquification occur at room tempreature within 10-30 minute avarage 20 minutes. 2. Chemical examination:- Fructose test of semen:- Fructose test is used to determined androgen deficiency or ejaculatory obstruction to semen .the level of seminal fructose is low in both condition fructose is measured qualitative by resorcinol’s. The fructose test is performed to detect the presence and amount of fructose in seminal fluid. Fructose is produced mainly by seminal vesicles and serves as the primary energy source for sperm motility. Requirements:-  *Diluted HCL *Resorcinol *Semen/specimen *Test tube  *Bansal burner  Procedure:- 1.  Take a 5 ml diluted HCL in a test tube. 2.  Add 1ml semen. 3. Add 5 mg resorcinol’s boil it for few minuts. Normal value:-                                        150-600 mg/dl. Interpretation:- Appearence of red colour indicate the presence of fructose. it can measured by spectrophotometer.                             -:Microscopic examination:- Semen examine under microscope motility of spermatozoa counting & spermtozoa morphology. Motility:- Motility with the help of liquefied semen make a wet mount sample slide and examin under the microscope first low power field and then highpowerr field microscope .normally within 2 hours of ejaculation mote than >60% spermatozoa  vagrasly motile, and in 6-8 hours 25-40% are motile.                                -:Spermatozoa counting:- Aim:- Spermatozoa counting done by improves new baur’s chamber. Principle:- Diluted spermatozoa charged in new baur’s chamber and count the 4 square cornor. Requirment :-  *Improved new baur’s chamber *Micro pepette*Semen*Diluting fluid*Test tube*Coverslips Diluting fluid:-  Sodium bicarbonate                    5 gmFormaline                                     10%Distilled water                             100 ml. Peocedure:- 1.Dilute the semen specimen in 1:10. 2.Charge the new baur’s chamber and weight for 2 minutes to allow the spermatozoa settle down. 3.Examine under microscope and count spermatozoa in 4 square cornor of new baur’s chamber and calculate them as follow. Calculation :-   Spermatozoa =  N×D/V =N×10/0.4 =N×25 Spermatozoa /ml= N×25×1000 =N×25000 Normal values:-     >60 million/ml >60 × 10⁶/ml Abnormal values:- <20 × 10⁶/ml Marphology examination of spermatozoa:- For the morphology’s  study of spermatozoa prpared a thin smear from liquified semen on a glass slide,and stained it with any of the romanowashky stain,pap stain or H&E stain. Observe atleast 200 spermatozoa for any abnormalities in their morphology normally 80% spermatozoa are normal. Normal marphology of spermatozoa:-Abnormal marphology of specimen. spermatozoa are motile reproductive cells a smooth rimmed oval shaped  head with 2.5  –  3.5µm wide and 5-6 µm  longan uncoilled 45 uncoild 45 µm long tail that should be thiner than head and mid piece.midpiece of the spermatozoa is a sigment between the head & mid piece is approximatlh similor to the head  Abnormal marphology of specimen:- Abnormal spermatozoa are aneble to fertilized egg. Abnormaltise in spermatozoz head:- 1.Detached or hatched head.The head of the sperm has separated from its tail. Such sperm are generally non-functional and cannot swim properly. 2.Large head:-A large-headed spermatozoon (also called macrocephalic sperm) is a sperm cell whose head is larger than normal. 3.Small head :-A sperm with a smaller-than-normal head, often associated with abnormal DNA/chromosome content and reduced fertility potential. 4.Elongated head:-A sperm with an abnormally long, narrow head. 5.Irregular head.A sperm with an abnormally shaped head; it is a morphology defect that may impair fertilization ability. 6.Amorphous head ;-A sperm with a head that lacks a normal. 7.Small acrosome head:-A sperm with an abnormally small acrosome (the cap-like structure on the head) 8.No acrosome head.:- A sperm lacking the acrosome on its head. Abnormal neck or mid poece defect:– Asemetric neck:-sperm in which the neck (connecting piece between the head and midpiece) is attached off-center or at an abnormal angle to the head. Bent neck :- A sperm in which the neck is sharply bent relative to the head or midpiece. Thin neck:-A

Laboratory instruments

Centrifuges principle,use, and working

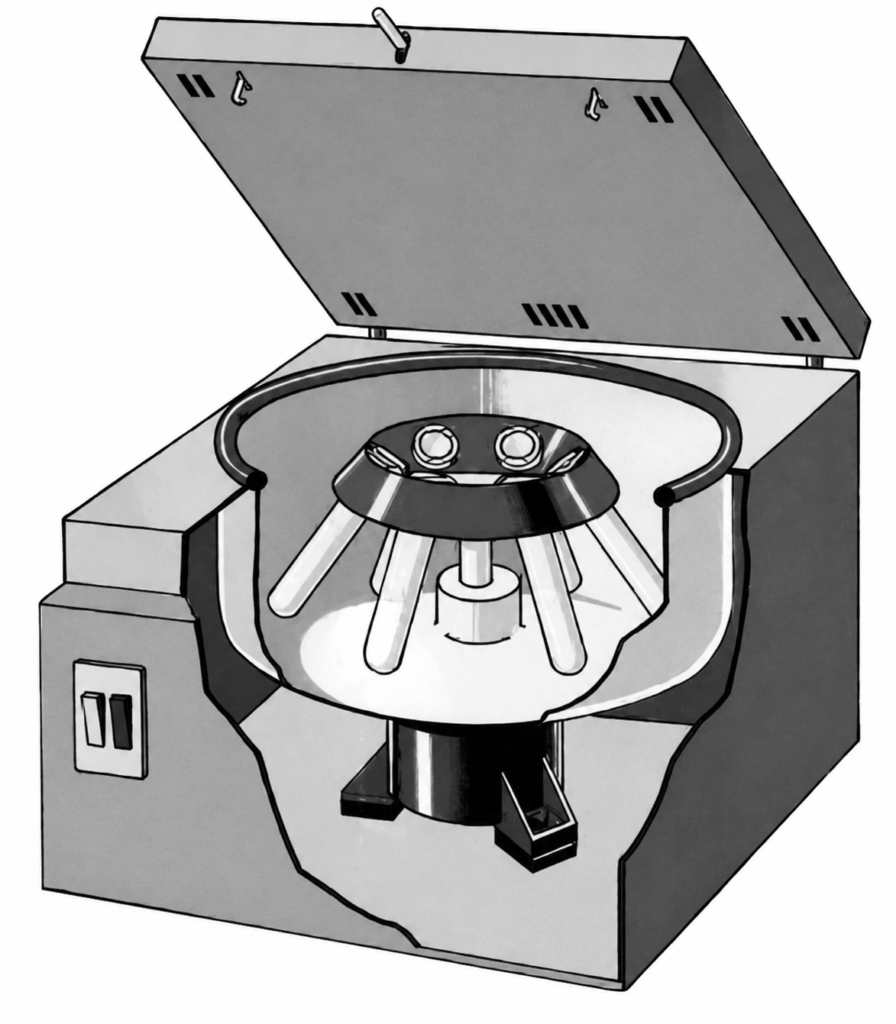
Centrifuges:- A centrifuge is a  mechanical device that rotates a container at high speeds to separate a mixture into its component parts based on their density.centrifuge are designed to accelerate the sedimentaion  process by using centrifugal force. The two general types of centrifuges used uin the laboratories are:- A. The swing out head type (horizontal rotor)   B. The anglehead type(fixed angle rotor) In the case of swing out head centrifuge the tubes are in a vertical position when the centrifuge is at rest and assume a horizontal position when the centrifuge is operating.The speed of centrifuge is more than 5000 RPM. The angle head centrifuge tubes are positioned rigidly at a fixed angle (20-40 degree) to the vertical of rotaion. due to the very low friction of air, angle head rotor units can attain much higher speed.The centrifuge capable of producing speeds up to 100,000 RPM with relative centrifugal force (RCF). The centrifuge based on the principle of centrifugal force, which acts on a sunstance in circular motion, towards the periphery. Principle:- The centrifuge based on the principle of centrifugal force, which acts on a sunstance in circular motion, towards the periphery. the factors which govern the speed of centrifugation are:- 1.The rotation per minutes. 2.length of radius: the radius is measured from the center rotation to the inside bottom of the tube. 3.Shape and size of the particles. 4.viscosity and specific gravity of the fluid under centrifugation. 5.Gracitational force acting on the particles. Important component of a centrifuge:- A centrifuge consists of the following main components:- 1. The centrifuge head(rotor):- The rotating part of the centrifuge,Holds the sample tubes. 2.Motor:- Provides the power required to rotate the rotor.Controls the speed of rotation (RPM). 3.Centrifuge Tubes:– Containers that hold the samples being separated.Usually made of glass or plastic and designed to withstand high speeds. 4 speed control and the additinal parts:- Used to set and monitor operating parameters such as speed (RPM), time, and temperature.Modern centrifuges often have digital displays. 5.Timer:- Allows the user to set the duration of centrifugation. Automatically stops the centrifuge when the set time is reached. 6.Spindle:-  Connects the motor to the rotor,Transfers rotational motion from the motor to the rotor. Uses of centrifuge:- The centrifuge is used in laboratory for various purpose such as:- 1.The separtaion of serum or plasma from blood. 2.Separation of sediment in urine. 3.Separation of protein free filtrate. 4.Washing of red blood cells by normal saline(cell suspension). 5. Separation of antigen boundfraction or antibody bound fraction from the free fraction in immonoassays. 6.Separates microorganisms such as bacteria, fungi, and viruses from liquid media. 7.Separates and purifies drugs, vaccines, and biological products during manufacturing in pharmaceutical industry. 8.Used in cell biology, biochemistry, genetics, and medical research for the separation of cellular organelles and other biological materials. Procedure for useing centrifuge:- 1.Place the samples in appropriate centrifuge tubes.Ensure that the tubes are properly labeled. 2.Place tubes of equal volume and weight opposite each other in the rotor.An unbalanced centrifuge can cause vibration and damage. 3.Insert the tubes securely into the rotor slots or buckets.Check that all tubes are properly seated. 4.Close the centrifuge lid firmly. 5.Select the required RPM (speed),Set the desired centrifugation time. 6.Switch on the centrifuge and allow it to reach the set speed. 7.After the set time, the centrifuge will stop automatically. 8.Carefully open the lid,Remove the tubes gently without disturbing the separated layers. 9.Clean the rotor and chamber according to laboratory guidelines. Care and Maintenence:- 1.Place the centrifuge on a firm base.it should not be placed near a sensitive equipment such as photometer or spectrophotometer, because it generates electrical noise and high current drain when stared up.It should not be run near the a combustible fluid. 2.Before the centrifugation,the centrifuge tubes and the cups or tubes of centrifuge should be balanced properly. 3.The chamber should be kept clean.All the splits should be clean immediately since it may contain biohazardous materials.(chemical,microbiological or radioactive) 4.Always make sure that the cover is closed while the centrifuge is operating .Never open the chamber until the rotor has come to a complete stop. 5. Observed for usual normal vibration noise during operation. The centrifuge may vibrate excessively,if the tubes inside are not balanced properly,should be check immediately. 6.Place a plastic cover on the centrifuge when nor use.    

Laboratory instruments

Constant temperature water bath

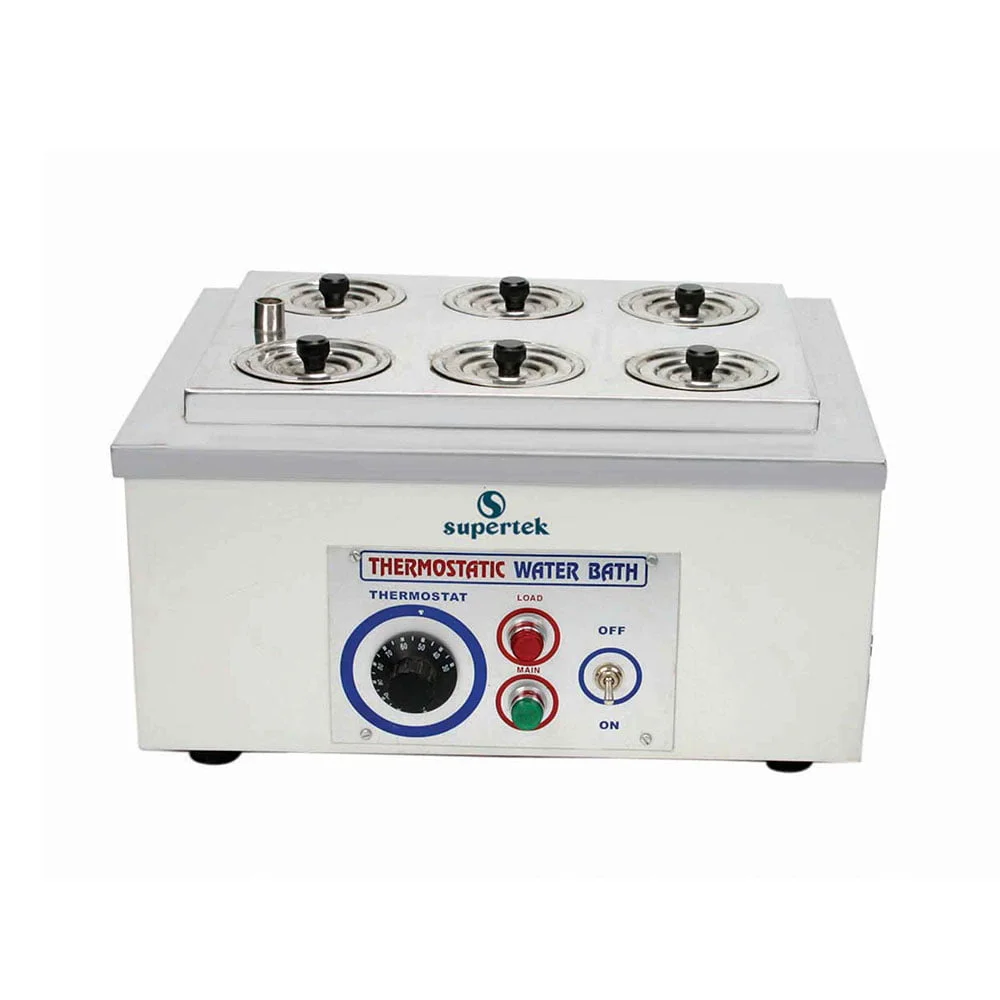
Water Bath:- A water bath is a laboratory instrument that consists of a container filled with water and equipped with a heating system to maintain a constant temperature for warming, incubating, or heating samples gently.water bath are a ubiquitous laboratory fixture , utilised for heating sample in a uniform, controlled environment. As opposed to direct heating techniques such as hot plates or open flames, water baths provide precise temperature control without degrading the sample, making them a necessity for pharmaceutical, chemical, and life science research. A water bath maintains samples at a constant temperature by transferring heat uniformly from heated water to the sample through conduction and convection. Principle:- A water bath works on the principle of heat transfer by conduction and convection. The primary principle of a laboratory water bath is indirect heat transfer, which uses heated water as a medium to provide gentle, uniform, and constant temperature control to submerged samples. Components:- 1.The container is generally made up of heavily nickel plated tank of about 20-30 liter capacity.  2.The heating is done by the strip heater clamped under the tank. 3.The temperature is controlled by a thermostat and regulated by a control knob. 4.The temperature can be recorded by a thermometer. Uses:- The water bath is used to carry out various chemical reactions at specific temeratures.depending upon the requirement of an experiment.The temperature of the water bath is controlled by a thermostatic arrangement.  The carious uses of a water bath are below. 1.Determination of serum enzymes(37°C). 2.Enzymatic determination of glucose, Urea, Cholesterol, Triglycerides etc.(37°C) 3.Serological determination(56°C). 4.Saponification(60-70°C). 5.Incubating samples  6.Heating reagents and solutions. 7.Melting substance(such as agar, gelatin, or wax.) 8.Warming culture media.(before use in microbiology laboratories.) Procedure for using water bath:- 1.Check the water bath to ensure it is clean and working condition. 2.Fill the bath with distilled water to the recommended level. 3.Switch on the water bath and set the desired temperature using the temperature control. 4.Allow the water to reach the set temperature and stabilize. 5.Place the sample (test tube, bottles or flasks) securely in a rack and immerse them in the water without allowing water enter the containers. 6.Incubate or heat the samples for the required time while monitoring the temperature. 7.Remove the sample carefully using protective gloves to avoid burns. 8.Switch off the water bath after use. 9.Empty, clean and dry the bath. Care and Maintenece of water bath:- 1.The water bath should be sufficiently filled with water before use. 2.Do not forget to put off main switch after use. 3.Cover the water bath when not in use.

Laboratory instruments

Incubators principle, uses,

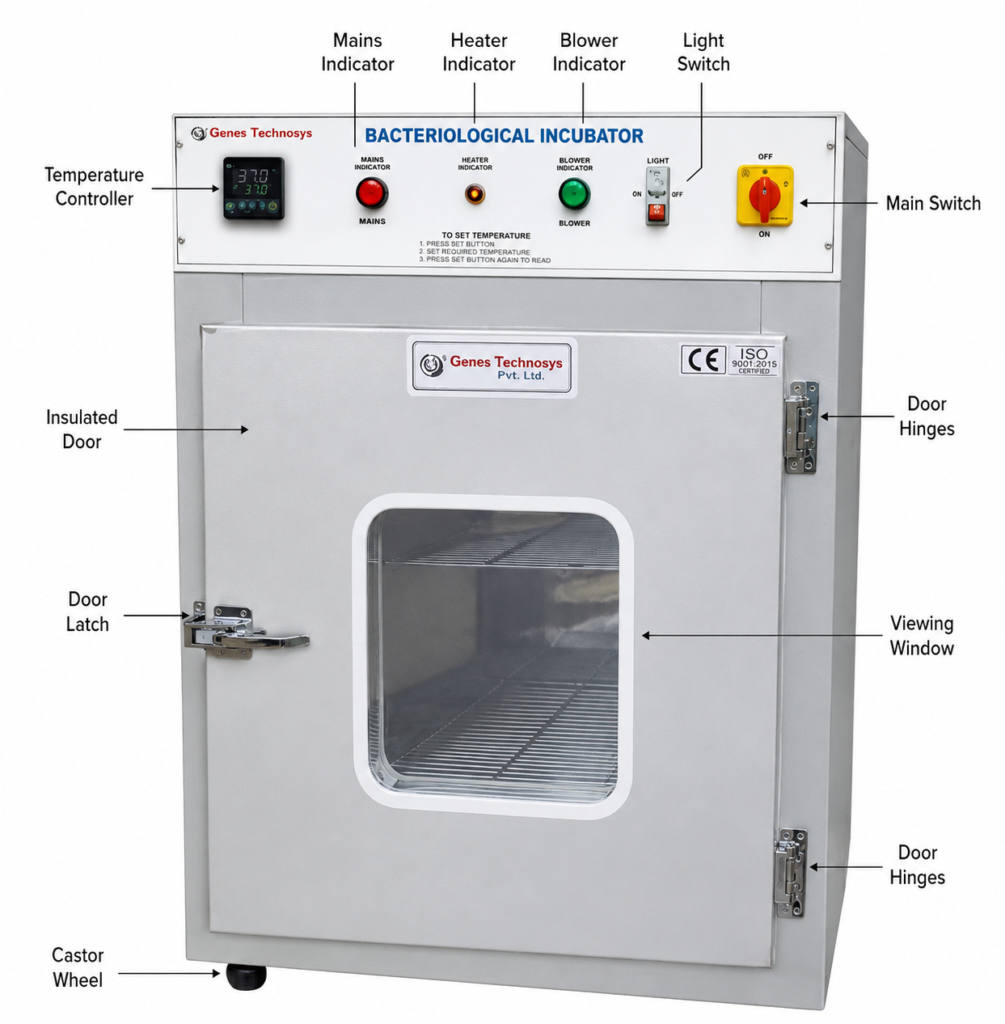
INCUBATORS:- An incubator is a laboratory device used to provide a controlled environment for the growth and maintenance of microorganisms, cell cultures, or biological samples. Principle:- The working principle of an incubator is based on the thermoelectric effect—the transformation of thermal energy into electrical energy. A thermostat regulates the internal temperature by generating a thermal gradient, which in turn maintains the desired conditions for microbial or cell culture growth. or An incubator operates on the principle maintaining a controlled environmental condition, primarily a constant temperature, to support the growth and development of microorganisms, cells, and tissues. It uses a heating system controlled by a thermostat to maintain the desired temperature. When the temperature drops below the set value, the heater turns on, and when the required temperature is reached, it turns off, ensuring stable conditions for biological growth. components:- 1.Cabinet(outer chamber) The external body that encloses and protects the incubator. 2.Heating Elements:- Gemerates heat to maintain the desired tempreature inside the chamber. 3.Thermostat/Temperature controller:- regulates and maintains the set temperature automatically. 4.Temerature sensor:- Maonitors the chamber temperature and provides feedback to the controller. 5.Shelves:- Hold culture plates, flasks, test tubes, and other laboratory materials. 6.Door and Viewing window:-Allow access to samples the transparent window enables observation without opening the door. 7.Power supply and indicator lights:- Provide electrical power and indicate operating status 8.The temperature can be controlled by using a control knob, and it is recorded by a thermometer temperature range (30-80°C). uses:- These are mainly used for:- 1.Determination of enzymes in the specimen by end point reaction methods 2.determination of glucose urea,uric acid, cholesterol, triglycerides etc by enzymatic methods. 3.Growing microorganisms on various culture media. 4.Pharmaceutical Research(Drug development and testing,Stability studies of pharmaceutical products.) 5.Biotechnology Applications(Production of enzymes, vaccines, and biological products,Genetic engineering and molecular biology experiment) 6.Food and Dairy Industry (Quality control testing of food products,Detection of microbial contamination.) 7.Environmental Studies (Cultivation of environmental microorganisms from soil, water, and air samples.) Types of incubatore:- The most prevalent kinds of incubators include: Bacteriological Incubators BOD Incubators CO2 Incubators Bacteriological incubators:- Microbiology labs commonly use these incubators for bacterial culture growth. They heat-regulate (no cooling mechanism) and operate between 35–37°C. They include programmable settings, a thermometer, and insulation to maintain internal conditions. The thermostat regulates the temperature, allowing for a consistent temperature set to the need. A thermometer attached to incubators displays the correct temperature. BOD Incubator (Biological Oxygen Demand Incubator) Also known as Low Temperature Incubators, these are used for fungal cultures, especially molds and yeasts, which require lower incubation temperatures (20–25°C). BOD incubators are also essential for wastewater testing to assess biological oxygen demand. Since a low temperature of about 20–25°C is necessary for biological oxygen demand testing, these incubators are known as BOD (biological oxygen demand) incubators. Therefore, don’t mix up the word because the function of BOD incubators is the same as that of bacteriological incubators. CO₂ Incubator:- CO₂ incubators are specially designed for tissue culture and cell line experiments, where precise control of CO₂ levels, humidity, and temperature is critical. The primary use for CO2 incubators is this technique of growing live creatures in vitro. Procedure for use:- *Clean the Incubator *Switch On the Power *Set the Temperature *Allow Temperature Stabilization *Place the Samples *Close the Door Properly *Monitor the Temperature *Incubate for the Required Time *Remove the Samples *Switch Off and Clean Care and maintenance:- 1.Do not forget to put off the main switch when the heating period is over. 2.Clean the incubator after use. Precaution’s:- Avoid frequent door opening. Keep temperature stable at all times. Clean and disinfect regularly. Use cotton plugs or moisture chambers for extended incubations. Label all cultures clearly to avoid mix-ups.  

Laboratory instruments, Uncategorized

Hot Air Oven for Dry Heat Sterilization

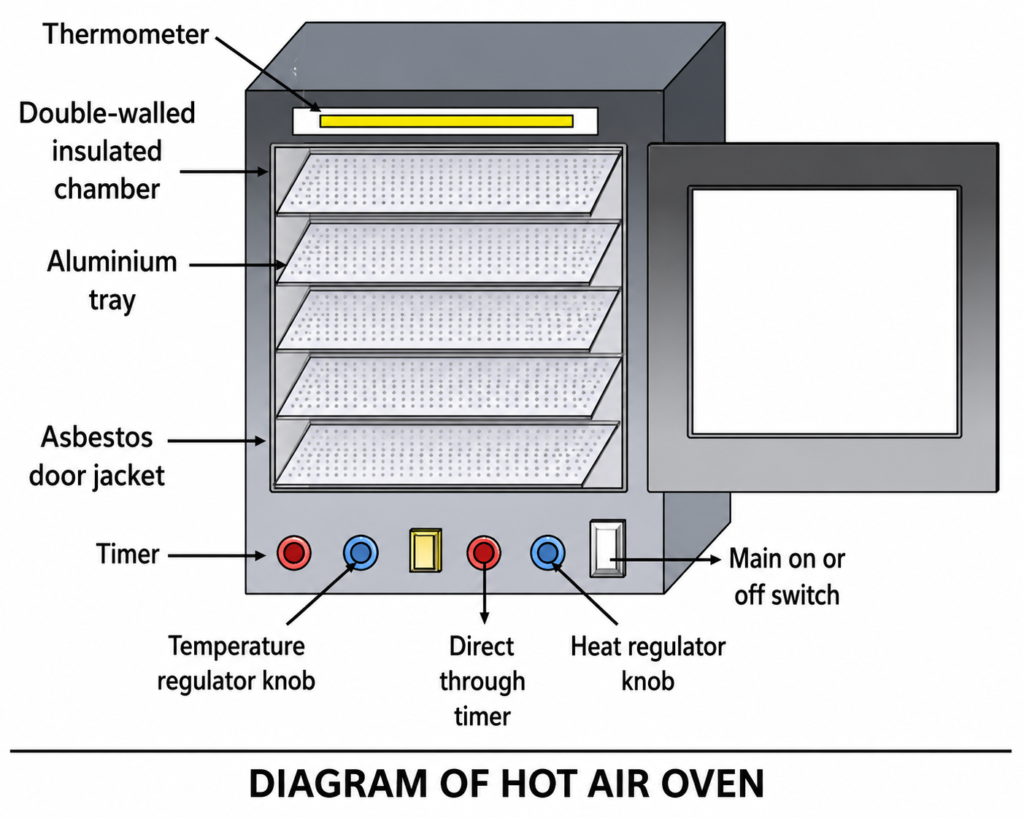
Hot Air Oven:- A hot air oven is a laboratory equipment used for dry heat sterilization of glassware, metal instruments, powders, oils, and other materials that can withstand high temperatures. Principle:-  When electricity is passed through the heating coils, electrical energh is converted to heat energy. the tempreture is controlled by a thermostat.                                                                                               orThe hot air oven works on the principle of dry heat sterilization. Hot air is circulated inside the chamber, and heat is transferred to the articles by conduction, convection, and radiation. The high temperature destroys microorganisms by oxidation of cellular components and denaturation of proteins. components :- 1. Double walled heavy gauge aluminium chamber.2. continuous heat elements externally wound on all sizes of the working chamber(These enable efficient heat transfer by conduction and radiation.)3. Thermal insulation by thick glass-wool between the working chamber and the outer mild steel casting.4. Thermostat- A temperature-control device in a hot air oven that maintains the desired temperature by automatically switching the    heating element on and off.5.Adjustable ventilator:- Allow controlled circulation and release of hot air and moisture.6.Pilot lamp:- A small indicator light on a hot air oven that shows whether the oven is switched on and receiving power.7.temperature controller:- A device used to set, monitor, and regulate the temperature inside a hot air oven. It maintains the selected temperature accurately for proper sterilization.8.Perforated metal selves:– Metal shelves with small holes that hold the materials inside the hot air oven and allow free circulation of hot air. 9. Thermometer:- An instrument used to measure and display the temperature inside the hot air oven.(temperature range 40°C to 300°C) Uses:- *Hot air oven is mainly used for the following various purposes:-*Dry sterilization such as Petri dishes, test tubes, pipettes, and flasks.*Preparation of anticoagulated bulbs.*Sterilization of non-aqueous materials like oils, fats, waxes, and powders.*Heating of chemicals used for the preparation of primary standards. *Drying laboratory materials and equipment. Procedure for Use:- 1.Place dry articles on the shelves.(In case of glassware, the excess water should be drained completely)2.Close door firmly.3.Put on the main switch.4.Control temperature by adjusting the control Knob.5.Keep it on for the required time period.6.Put off the main switch.7.Remove the articles. Care and Precautions:- 1.Do not forget to put off the main switch when the heating period is over.2.Cleen the hot air oven after use.3.Do not overload the chamber; allow proper air circulation.4.Switch off the oven after use and allow it to cool before cleaning.5.Use heat-resistant gloves when handling hot materials.

CYTOLOGY

MAY-GRÜNWALD GIEMSA STAIN

MAY-GRÜNWALD GIEMSA STAIN:- This is one of the common Romanwsky stains used in cytology. It is useful for studying cell morphology in air-dried smears. It is superior to Papanicolaou to study the cytoplasm, granules, vacuoles, basement membrane material etc. For nuclear staining Papanicolaou is superior. Contents of the staining reagents:- May-Grünwald solution                                               0.2%  Methanol                                                                       99 %May-Grünwald´s eosin-methylene blue                    0.2 % Contains:- Eosin G, Methylene blue Giemsa solution:- Methanol                                                                       73 % Glycerol                                                                         26 %Giemsa´s Azur-Eosin-Methylene blue                      0.6 % Contains: Azur I, Eosin G, Methylene blue Phosphate buffer:- Potassium dihydrogen phosphate/ disodium hydrogen phosphate x 2H2O  (67.0 mmol/l) Storage:- Giemsa solution, May-Grünwald solution: protected from light at 2-25°C.Unopened reagents may be used until the expiry date on the label.Phosphate buffer: at 2-8°C. Unopened reagents may be used until the expiry dateon the label. Preparation of working solutions:- 1. Buffered water: Dilute phosphate buffer with deionised or distilled water1:20, e.g. 30 ml phosphate buffer + 570 ml deionised or distilled water.2. Giemsa working solution : Mix 84 ml of Giemsa solution into 516 ml ofbuffered water.3. May-Grünwald working solution: Mix 360 ml of May-Grünwald solutioninto 240 ml of buffered water. Staining method:- 1. Fix the air-dried smear specimen in methanol for 10 -20 minutes2. Stain with May-Grünwald working solution for 5 minutes3. Stain with Giemsa working solution for 12 minutes4. Wash with clean buffered water for 2, 5 and 2 minutes5. Dry the slides in upright position at room temperature6. Mount the slides with a coverslip using DPXAny modifications to the staining procedure/working solutions may affect thestaining result, and are subject to precise method validation Sources of errors:- Irregular distribution of the blood smear on a glass slide may result in an erroneous cell counts. Alcohols used for wiping the skin may cause hemolysis and artifacts. Do not let the specimens dry at any stage of the staining procedure. Wash properly to avoid dye artifacts. Buffered water is strongly recommended for washing. Staining result is dependent on pH. Alkaline pH increases blue and acidic pH pink or reddish tinge in the stained specimen. Ziehl-Neelsen stain:- Reagents:-   (1) Carbol Soft FuchsinBasic Fuchsin 1 gmAbsolute alcohol 10 mlAdd the basic fuchsin to the alcohol in a 100 ml flask and mix, on amagnetic stirrer for 30 minutes. Add 100ml of 5% aqueous phenol. Mixwell. Filter and store in a brown glass bottle. (2) Acidified Methylene Blue0.25% methylene blue in 1% acetic alcohol (3) 0.5% Acid AlcoholDistiller water 700 mlAbsolute alcohol 300 mlHydrochloric acid 5 ml (6) 5% Sulphuric AcidDistilled water 475 mlSulphuric acid 25 ml Staining Method:- Place fixed slides on the staining rack in serial order, smeared side up. Slides should be separated by a 1 cm gap, and should never touch one another. Cover slides individually with filtered Ziehl’s carbol fuchsin working solution. Heatslides from underneath with the flame of a Bunsen burner, an alcohol lamp or an alcohol soaked cotton swab until vapour starts to rise. Staining solution should never be allowed to boil. Do not allow the stain to dry. Keep slidescovered with hot, steaming carbolfuchsin for 5 minutes by re-flaming as needed. Rinse slides gently with water to remove excess carbolfuchsin. Drain off excess rinsing water from slides. Sputum smears appear red in colour.   Decolourising: Cover slides with 25% sulfuric acid or acid-alcohol solution and allow to stand for 3 minutes, after which the red colour should have almost completely disappeared. If needed, repeat sequence until the red colour disappears, but do not overdecolourise. Gently wash away the sulfuric acid or acid alcohol and the excess stain with water. Drain off excess rinsing water from slides.   Counterstaining: Cover slides individually with 0.3% methylene blue counterstaining solution and allow to stand for 1 minute. Rinse slides individually with water. Drain water off the slides, which are then allowed to air dry.   A properly stained smear should show a light blue colour due to methylene blue. Results:- Tubercle bacilli, hair shafts, Actinomyces, some fungal elements- red. Background: pale blue.

CYTOLOGY

STAINING IN CYTOLOGY

CYTOLOGY STAINING METHODS:- INTRODUCTION:- Consistency and reliability are most important in cytological interpretation. Cytologists rely heavily on the quality and appearance of the stain. The Papanicolaou stain is recommended for the staining of alcohol fixed cytology slides. Romanowsky stains may also be used for wet fixed slides, but are primarily applied to air-dried smears.Special stains are used as per requirements: Modified Ziehl Neelson (for acid fast bacilli), Gram staining (Bacteria), Mucicarmine (mucins), PAS (for glycogen, fungal wall, lipofuscin, etc), Oil red O (lipids), Perl’s Prussian blue (iron), modified Fouchet’s test (bilirubin), etc. Recently, immunocytochemistry is also being increasingly used in cytology specimens. These special stains and immunocytochemistry will be discussed along with respective sections inhistopathology as the principles and methods remain the same.  STAINING IN CYTOLOGY:- The universal stain for cytological preparations is the Papanicolaou stain. Harris’hematoxylin is the optimum nuclear stain and the combination of OG6 and EA50 give the subtle range of green, blue and pink hues to the cell cytoplasm. Papanicolaou stain:- Papanicolaou formula:- 1. Harris’ hematoxylin:- Hematoxylin                               5g Ethanol                                        50mlPotassium alum                        100gDistilled water (50°C)               1000 mlMercuric oxide                           2-5gGlacial acetic acid                     40ml 2. Orange G 6:- Orange G (10% aqueous)                50ml Alcohol                                               950mlPhosphotungstic acid                     0-15g 3. EA 50:- 0.04 M light green SF                      10ml 0.3M eosin Y                                     20ml Phosphotungstic acid                     2g Alcohol                                              750mlMethanol                                           250mlGlacial acetic acid                           20mlFilter all stains before use Original Papanicolaou staining method:-  1. 96% ethyl alcohol 15 seconds                                                                                                                                                     2. 70% ethyl alcohol 15 seconds                                                                                                                                                     3. 50% ethyl alcohol 15 seconds                                                                                                                                                     4. Distilled water 15 seconds                                                                                                                                                             5. Harris hematoxylin 6 minutes                                                                                                                                                       6. Distilled water 10 dips                                                                                                                                                                   7. Hydrochloric acid 0.5% solution, 1-2 quick dips                                                                                                                       8. Distilled water 15 seconds                                               

Histopathology

HORMONAL ASSESSMENT REPORTS

INTRODUCTION:- The established approach to the evaluation of ovarian function and endocrine disorders in the woman is based on serial biochemical analyses of hormones, such as estrogen, progesterone, luteinizing hormones and their metabolites. In women who suffer from menstrual disorders and abnormalities of the ovarian cycle, the biochemical analyses can be effectively supplemented by the old fashioned endometrial biopsies, or studies of endocervical mucus. In addition, the cervicovaginal smear may sometimes provide useful information and has the advantage of being easy to obtain, rapidly evaluated, and inexpensive. The cytologic approach is particularly valuable if laboratories specializing in endocrine analysis are not readily available. The principle of the cytologic hormonal analysis is simple. The degree of maturation of the squamous epithelium of the female genital tract depends on steroid hormones, mainly estrogen. HORMONAL ASSESSMENT:- Naturally occurring estrogen, or the parenteral administration of estrogen or its natural or synthetic substitutes in adequate amounts, produces a rapid and complete maturation of the normal squamous epithelium of the female genital tract with a resulting preponderance of mature superficial squamous cells in smears. The effect takes place regardless of the prior hormonal status, except during pregnancy. Conversely, complete atrophy of the squamous epithelium of the vagina and cervix may be equated with complete absence of estrogenic activity. However, there are no reliable data linking intermediate degrees of maturation of the squamous epithelium with the action of a specific hormone or hormones. Evaluation of the endocrine status of a menstruating woman during the childbearing age belongs among the most difficult tasks in diagnostic cytology. There is considerable variation in the smear patterns from one patient to another, even if matched for age and menstrual history. Several conditions must be fulfilled before a successful hormonal evaluation of the squamous epithelium may be undertaken. 1.There must be absence of inflammation or cytolysis. 2.There must be no recent medication, either topical or systemic, especially with compounds known to affect the squamous epithelium of the lower genital tract. 3.There must be no history of radiotherapy or recent surgery to the vagina or cervix. 4.An adequate baseline investigation must have been performed in menstruating women. This should include daily smears during at least one and preferably two complete cycles, or their chronologic equivalent. In nonmenstruating patients, two or three smears may suffice. 5.The smears should be obtained from the proximal portion of the lateral wall of the vagina, care being taken to avoid contamination with material from the adjacent cervix. The Karyopyknotic Index (KI):- The karyopyknotic index expresses the percentile relationship of superficial squamous cells with pyknotic nuclei to all mature squamous cells. Usually, 200 to 400 consecutive cells in three or four different fields on the smear areevaluated. The peak of KI usually coincides with the time of ovulation and was estimated at 50% to 85% of total cells. The Eosinophilic Index (EI):- The eosinophilic index expresses the percentile relationship of mature squamous cells with eosinophilic cytoplasm to all mature squamous cells, regardless of the status of the nucleus. In a normal menstruating woman, the peak of EI coincideswith the peak of KI and may reach 50% to 75% at the time of ovulation. The Maturation Index (MI):- The maturation index expresses the maturation of the squamous epithelium as a percentile relationship of parabasal cells to intermediate cells to superficial cells. The count should be performed on single cells. For example, in a normalmenstruating woman at the time of ovulation, an MI of 0:35:65 would indicate that the smear contained no parabasal cells, 35% of intermediate cells, and 65% of superficial cells. Other Indices:- The folded-cell index represents the relationship of mature superficial or intermediate squamous cells with folded cytoplasm to all mature squamous cells. The crowded-cell index represents the relationship of mature squamouscells lying in clusters of four or more cells to all mature squamous cells. Alternative Ways of Reporting Hormonal Status:- It has been a common practice to base the evaluation of the maturation of the squamous epithelium on an overall visual impression gained during the routine screening of smears. This simplest of methods has not failed in revealing majorabnormalities of smear patterns. By comparing the current smear pattern with original baseline smears, a good appreciation of changes in smear pattern may be gained. Small variations in smear pattern have no diagnostic meaning but maystrongly influence the indices and thus give a false impression of hormonal “effects.” The reporting of smears based on this overall visual impression is always given in reference to age, menstrual history, and possible clinical significance. Some examples follow: Patient age 35: “Midcycle smear pattern—consistent with functioning ovaries.” Patient age 52: “Absence of maturation of squamous cells consistent withmenopause.” Patient age 25: “Absence of maturation of squamous cells—abnormal for age.” Patient age 60: “High level of maturation of squamous cells not consistent with clinical menopause. It is assumed that this patient is not receiving estrogens or other drugs that may account for this smear pattern.”  DETERMINATION OF THE TIME OF OVULATION FROM CERVICOVAGINAL SMEARS:- A precise determination of the time of the ovulation is important in artificial insemination and in in-vitro fertilization. The use of the cervicovaginal smears to establish the time of ovulation or the status of the endometrium has been of limited reliability. It is recommended that cytologic methods for estimation of ovulation or status of the endometrium be supplemented by other procedures, such as temperature curves and endometrial biopsies. The examination of endocervical mucus may also be of assistance. Cyclic changes in the physicochemical properties of the cervical mucus have been known for a great many years. Prior to ovulation, the mucus tends to be viscous and when placed on a glass slide, form crystalline, fern-like structures, whereas at the time of and after ovulation, the mucus is more liquid and does not crystallize. Cytologic evaluation for menstrual abnormalities:- 1. Cytologic hormonal evaluation may be of assistance in the evaluation of amenorrhea (cessation of menses), in women who have never menstruated (primary amenorrhea) or who stopped menstruating at a young age after

Histopathology

STAIN FOR RETICULIN FIBRES

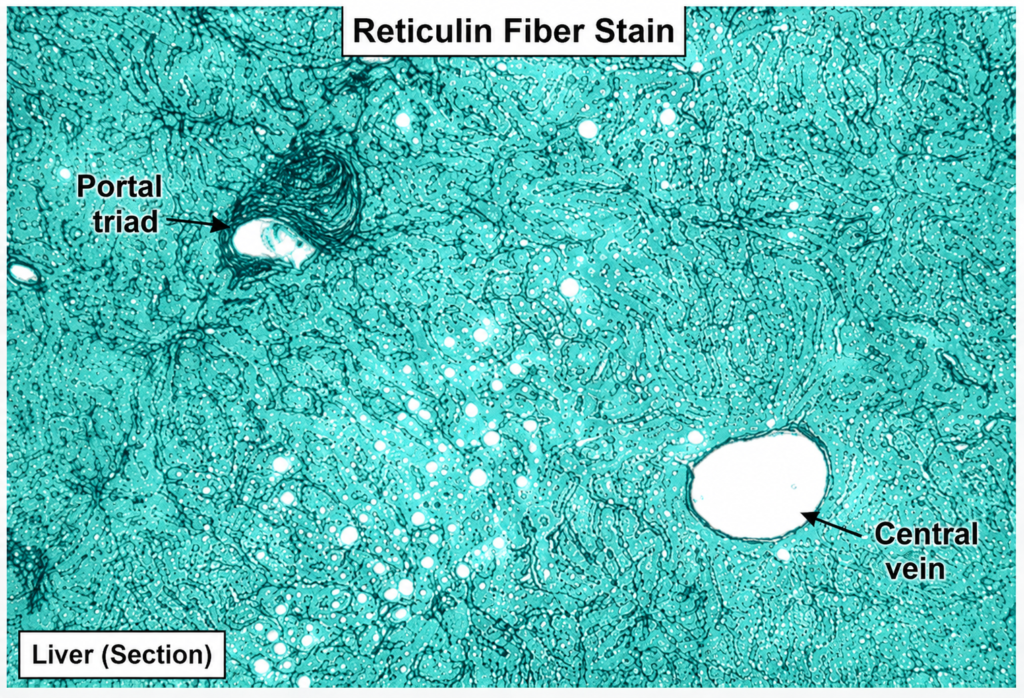
STAIN FOR RETICULIN FIBRES:- Aim: To identify reticulin fibers in sections. Principle: Reticulin fibers are treated with potassium permagnate to produce sensitized sites for silver deposition. Silver is in a form readily able to precipitate as metallic silver. Formalin, a reducing agent causes deposition of metallic silverat pH 9.0.Excess silver is removed by sodium thiosulphate solution .Treatment with gold chloride produces permanent precipitate. Control:  Normal liver. Reagents:- Acidified potassium permagnate 0.5% potassium permagnate                                    95ml3% sulfuric acid                                                           5mlSolution should be made fresh. Silver nitrate solution To 5ml of 10% aqueous silver nitrate, add strong ammonia drop by drop until the precipitate which has formed initially is dissolved. Add 5ml of 3% sodium hydroxide. Again add strong ammonia drop by drop till the precipitate is completely dissolved. Add distilled water to make it 50ml and keep it in a jar. 2% Oxalic acid Oxalic acid                                          2gmDistilled water                                   100ml 4% aqueous iron alum Ferric ammonium sulphate               Distilled water                                  100ml 10% Formalin:– Formaldehyde                                  10mlDistilled water                                  100ml 0.2% Gold chloride:- Gold chloride                                   0.2%Distilled water                                100mlStore in refrigerator 2% Sodium thiosulphate:- Sodiun thiosulphate                      2gmDistilled water                               100ml Neutral red (acidified):- Neutral red                                      1gmDistilled water                                100mlGlacial acitic acid                          1mlDissolve the dye in distilled water. Add the acid, mix, filter and store. Procedure:- 1. Deparaffinize and bring the sections to water.2. Oxidize in acidified potassium permagnate for 3 minutes.3. Rinse in distilled water.4. Decolorize with 2% oxalic acid for 1 minute.5. Rinse in distilled water.6. Put iron alum for 10 minutes.7. Rinse in distilled water.8. Put ammonical silver solution for 10 seconds.9. Rinse in distilled water.10. Immediately reduce with formalin for 2 minutes.11. Wash in running tap water for 2 minutes.12. Tone in 0.2% gold chloride for 2 minutes.13. Rinse in distilled water.14. Fix in 2% thiosulphate for 2 minutes.15. Wash in water for 2 minutes.16. Counter-stain with neutral red for 2 minutes.17. Dehydrate, clear in xylene and mount in DPX. Result:- Reticulin fibres                                  blackNuclei                                                 red Note:-All glassware should be cleaned thoroughly. Silver solution should be made fresh.Step 12 should be omitted in liver sections.Counter-stain may be omitted in trefine biopsies.

Scroll to Top