Uncategorized

Uncategorized

Cytologic Screening: Detecting Cellular Changes Before Symptoms Appear

INTRODUCTION:- Screening of diseases gained significance in medicine at the end of the nineteenth century, when public health authorities emphasized the importance of screening methods for certain diseases. In 1941, George Papanicolaou demonstrated a test for the early detection of cervical cancer, contributing toward the creation of screening programs. Prevention and early diagnosis are major factors in reducing morbidity and mortality resulting from neoplasia. Screening of diseases involves a test or examination that can detect the existence of a particular disease in a high-risk population, asymptomatic or with minimum symptoms of the disease.  CYTOLOGICAL SCREENING:- Screening of a particular disease requires a precise test, easy to do, at a low cost,and the capability of detecting the presence of a lesion. Cancer of the uterine cervix is an important cause of morbidity and mortality among women worldwide and a leading public health problem. It is the second most common cancer in women, but the most common in developing countries. Because of the phases that precede the lesion in the natural progress of invasive cervical cancer, and because they can be easily discovered and treated, the disease is well suited.to screening programs. The Papanicolaou test is an established method for examining the cells collected from the cervix to determine whether they show signs of pre-neoplastic differentiation. Cytologic screening programs have led to a large decline in cervical cancer incidence and mortality in developed countries. However, cervical cancer remains largely uncontrolled in high risk developing countries because of ineffective or no screening. Cervical cancer can be avoided when there is an early diagnosis of the precursor lesions, without local or systemic compromise. Among the methods available for early detection of cervical cancer, exfoliative cytology, or the Pap test, is recommended worldwide for mass screening, because the efficacy in the detection of premalignant lesions, associated with the social role of the method, permits minimization of costs with curative medicine. The basic integrated actions include: (1) care with collection, (2) processing of the smears, (3) screening and interpretation of the specimens, (4) follow-up of the patients, and (5) quality control. 1. Care with collection: The majority of false-negatives arise from problems with collection of specimens, and for this re 0ason this stage should be systemized and there should be training and recycling of the personnel responsible for taking the samples. The smears must be well identified, slim, uniform, and without contaminants, and contain samples from the transformation zone, where in the majority of cases the cervical cancer develops. There should be a minimum of blood, mucus, or other obscuring material such as lubricating gel. It is also important at this moment to adequately fix the material so as not to compromise subsequent stages. 2. Processing the specimens:- One of the characteristics of the Pap test is that it consists of various stages. Each stage should be monitored so as to minimize the possibility of error. The condition on arrival of the slides, and the number of slides per case, must be verified. Special care should be taken with the flow of the tests, with adequate numbering and balanced coloration with control of the number of cases colored in each set. The end product of this stage will be fundamental to a good result with the rest. 3. Screening and interpretation of the specimens:-The screening should be done in as little time as possible, depending on the basic requirements of each program, by trained and qualified personnel. Care should also be taken with excess workloads for cytopathologists and cytotechnicians, and also with refresher courses and recycling. The report on the tests should be systemized and use a unique nomenclature, of which all involved in the preparation and interpretation of the results should be fully aware. 4. Follow-up of patients:- Mere detection of the lesions will not determine the impact on the natural history of the disease. For this reason the treatment of lesions in a pre-invasive stage is fundamental.5. Quality control:- Quality is fundamental in gynecological cytopathology. One of the greatest problems in mass cytology is the false-negative cases. Cytopathology labs must have mechanisms for internal quality control with the objective of avoiding false-negative and false-positive tests. External quality control must be included in the design of the prevention program. THE ROLE OF LABORATORY IN SCREENING PROGRAMS:- The laboratory can make an important contribution to the structuring and organization of cervical screening programs based on the Papanicolaou test. The lab, when integrated into a screening program, should have among its objectives top quality production, training, and updating of personnel and the guarantee of a secure place of work, where risk factors are under control and the environment is protected. The system of internal monitoring of laboratory quality includes a set of actions, which should be developed and disseminated in a coordinated way, involving the various stages in the work process, from collecting a sample to issuing the report. The system aims to accompany and evaluate the cyto- and histopathologic diagnostic procedures in the laboratories, thus helping to determine areas where improvements can be planned and implemented, and also evaluate the impact of these actions and the incorporation of new practices.The majority of cervical cancer occurs in developing countries. The success of cervical cancer screening is shown by its ability to reduce the incidence of cervical cancer and the resulting mortality. The integration of procedures is essential for a successful screening program. Recently new technologies for alternative and complementary forms of screening such as liquid-based cytology and automated cytology have been proposed. A combination of methods has been proposed in an attempt to improve the sensibility of the Pap test. Among these, the association of cytology with the molecular test for HPV using hybrid capture has been highlighted. Automated cytology may be used for the purpose of reducing human errors caused by human fatigue, and to detect lesions with a lesser number of abnormal cells in the sample. HPV vaccine will be an additional tool in the strategies to reduce morbidity and mortality from cervical cancer and will be a component of a comprehensive strategy with the long-term goal of eliminating the disease. Cytologic screening can also be performed in selected high-risk

Uncategorized

SPECIAL PROCESSING FOR HISTOPATHOLOGY

Introduction:- Some pathological specimens require special handling and need to be processed in a different way to reach the final diagnosis. Examples include eyeball, bones and bone marrow biopsy. The technical person needs to be aware of these special specimens so that appropriate measures can be taken before the grossing procedures are undertaken. BONE:- Normal human skeleton has two main types of bones: cortical or compact bone which is hard, solid and very strong and forms shafts of long bones i.e. the femur and tibia etc; and spongy or trabecular/ cancellous bone is found in the marrow cavities and is a mesh of bone strands which is almost ideal weight bearing structure particularly in the femoral head and vertebrae. The three major components of bone are mineral, cells and an organic extra-cellular matrix i.e. collagen fibers. The main bulk of bone is approximately 70% mineral and 30% organic components by weight. Bone cells are relatively few as opposed to marrow cells. The mineral of bone is mainly calcium and phosphate. Techniques for the demonstration of bone and its components include:- * For decalcified bone: frozen, paraffin, or celloidin sections, transmission electron microscopy.* For mineralized bone: frozen, plastic, scanning and transmission electron microscopy. In order to obtain satisfactory paraffin sections of bone, inorganic calcium must be removed from the organic collagen matrix, calcified cartilage and surrounding tissues. This is called decalcification and is carried out by chemical agents, either with acids to form soluble calcium salts or with chelating agents that bind to calcium ions. Any acid, however well buffered, can have damaging effects on tissue staining. The problem increases with acidity of solution and duration of decalcification period. It mostly affects the nuclei which fail to take up hematoxylin and other basic dyes. These effects can be reduced by doing thedecalcification end point test, post-decalcification acid removal and adjustment of the stain procedure.  DECALCIFYING AGENTS:-Acids:-Acid decalcifiers can be divided into two groups: strong (inorganic) and weak.Strong Inorganic acids:- e.g. nitric and hydrochloric acids may be used as simple aqueous solutions (5-10%). They decalcify rapidly but cause tissue swelling and can seriously damage tissue stainability if used longer than 24-48 hours. Old nitric acid is particularly damaging and should be replaced with fresh stock They also damage tissue antigens for immunohistochemistry and enzymes may be totally lost. They can be used for small needle biopsies to permit rapid diagnosis within 24hrs. They can also be used for large or heavily mineralized bones with decalcification progress being carefully monitored. Aqueous Nitric acid, 5-10% Nitric acid                                          5-10 mlDistilled water                                   To make 100mlFormalin-nitric acid:-Formaldehyde (37-40%)                     10 mlDistilled water                                      80 ml      Nitric acid                                             10 mlWeak organic acids:-e.g. fromic, acetic and picric acid. Of these three formic acid is the only weak acid which is used in decalcification. Other two are used as components of other fixatives. Formic acid solutions can be aqueous (5-10%), buffered or combined with formalin. The formalin-10% formic acid mixture fixes and decalcifies simultaneously and can be used for small biopsies. Formic acid is suitable for most routine surgical specimens, particularly when immunohistochemistry is needed. Decalcification is usually complete in 1-10 days and decalcification progress should be monitered by a decalcification end point test. Aqueous formic acid:- 90% stock formic acid                               5-10 ml Distilled water                                             To make 100 ml Formic acid-formalin:- 90% stock formic acid                              5-10 ml Formaldehyde (37-40%)                           5 mlDistilled water                                            To make 100 ml Buffered formic acid:- 20% aqueous sodium citrate                  65 ml90% stock formic acid                             35 ml CHELATING AGENTS:- The chelating agent used for decalcification is ethylene-diaminetetracetic acid (EDTA). Although called an acid, it does not act like acids. EDTA will not bind to calcium below pH 3 and is faster at pH 7-7.4. This is a very slow process that does not damage tissues or their stainability, it also retains good antigen preservation for immunohistochemistry or enzyme staining and electron microscopy. The time required to totally decalcify dense cortical bone may be 6-8 weeks or longer although small bone spicules may be decalcified in less than a week. Formalin-EDTA:- EDTA, disodium salt                                     5.5 g Distilled water                                               90 ml Formaldehyde (37-40% stock)                   10 ml Aqueous EDTA, pH 7.0-7.4:- EDTA, disodium salt                         250 gDistilled water                                   1750 ml If solution is cloudy, adjust to pH 7 with sodium hydroxide. Factors influencing the rate of decalcification:- There are several factors influencing the rate of decalcification. The concentration and volume of the active reagent, including the temperature at which the reaction takes place, are important at all

Uncategorized

Decoding Life: A Demonstration of DNA, RNA, and Mitochondria

INTRODUCTION:- Nucleoproteins are combinations of basic proteins and nucleic acids. The two nucleic acids are deoxyribonucleic acid (DNA), which is mainly found in nucleus and ribonucleic acid (RNA) which is located in the cytoplasm of cells, mainly in the ribosomes. Both DNA and RNA molecules consist of alternate sugar and phosphate groups with a nitrogenous base being attached to each sugar group. The sugar in DNA is deoxyribose and in RNA it is ribose. The demonstration of nucleic acid depends upon either the reaction of dyes with the phosphate groups or the production of aldehydes from the sugars.  DNA:-The demonstration of DNA is either by Feulgen technique (which demonstrates the sugar deoxyribose) or the methyl green-pyronin technique (where the phosphates combine with basic dye methyl green at acidic pH). It can also bedemonstrated by fluorescent methods using acridine orange, but is considered less reliable than the above mentioned methods. The definitive and mostsensitive technique is in situ hybridization.  FEULGEN TECHNIQUE:-  This technique involves mild acid hydrolysis with 1M hydrochloric acid at 60°C to break the purine-deoxyribose bond, the resulting exposed aldehydes are then reacted with Schiff’s reagent to stain the DNA red-purple in color. Feulgen nuclear reaction for DNA:- Fixation: Not critical but do not use Bouin’s fixative. Solutions:- (a) 1 M hydrochloric acid                  Hydrochloric acid (conc.)                              8.5 mlDistilled water                                                 91.5 ml (b) Schiff reagent(c) Bisulfite solution  10% potassium metabisulfite                         5 ml1M hydrochloric acid                                       5 mlDistilled water                                                  100 ml 1. Bring all sections to water.Rinse                                                                                                                                                      2.sections in 1M HCl at room temperature.3. Place sections in 1M HCl at 60°C4.Rinse in 1M HCl at room temperature, 1 minute.5. Transfer sections to Schiff’s reagent, 45 minutes.6. Rinse sections in bisulfate solution, 2 minutes, repeating twice again.7. Rinse well in distilled water.8. Counterstain if required in 1% light green, 2 minutes.9. Wash in water.10. Dehydrate through alcohols to xylene and mount. Results:- DNA                                    red-purpleCytoplasm                         green RNA:-The method of choice for demonstrating RNA is the methyl green-pyronintechnique. Methyl green-pyronin:-Methyl green is an impure dye containing methyl violet. When methyl violet hasbeen removed by washing with chloroform, the pure methyl green appears andis specific for DNA. Both dyes are cationinc, when used in combination methylgreen binds preferentially and specifically to DNA, and pyronin binds RNA. Methyl green-pyroninmethod for RNA Fixation: Carnoy preferred, but formalin acceptable. Staining Solution: Methyl green pyronin Y 2% methyl green (chloroform washed)                         9ml2% pyronin Y                                                                      4 ml Acetate buffer pH 4.8                                                      23 mlGlycerol                                                                             14 mMix well before use. Method:- 1. Take sections down to water.2. Rinse in acetate buffer pH 4.8.3. Place in methyl green-pyronin Y solution for 25 min.4. Rinse in buffer.5. Blot dry.6. Rinse in 93% ethanol, then in absolute ethanol.7. Rinse in xylene and mount. Results:-DNA                  green-blueRNA                  red MITOCHONDRIA:-Mitochondria are the cytoplasmic organelle found in variable numbers in allanimal cells. Large number of mitochondria in the cells can change theappearance of cells. Mitochondria are considered the ‘power houses’ of the cellas many of the energy producing biochemical reactions like oxidativephosphorylation and Krebs cycle activity takes place in mitochondria.Mitochondria can be demonstrated by electron microscopy, enzyme histochemistryand histological methods however electron microscopy is the most satisfactorymethod. Histopathological methods such as Altman’s technique for mitochondriais simple and useful for demonstration of mitochondria. Altman’s technique for mitochondria:- Fixation:-Champy’s fluid is usually recommended, Helly’s fluid works equally as well. Aniline-acid fuchsin – saturated solution of acid fuchsin in 5% aniline indistilled water. Differentiator 1Saturated alcohalic picric acid                         10 ml30% alcohol                                                          40 ml Differentiator 2Saturated alcohalic picric acid                          5 ml30% alcohol                                                          40 ml Method:-1. Take sections down to water.2. Flood sections with aniline-acid fuchsin solution.3. Gently heat the slide until steam rises and

Uncategorized

METACHROMATIC STAINING

INTRODUCTION:- There are certain basic dyes belonging to aniline group that will differentiate particular tissue components by giving them a different color to that of original dye. The phenomenon is known as metachromasia. METACHROMASIA:-Metachromasia takes place when certain negatively charged groups on the tissue react with cationic dyes. On polymerization the original colour of the dye changes to another colour (eg mast cell stain pink with toluidine blue). Thionin and toluidine blue dyes are commonly used for quick staining of frozen selection using their metachromatic property to stain nucleus and cytoplasm differently.Metachromasia is enhanced when intermolecular distances are reduced. Factors which enhance metachromasia are:- 1. Increasing concentration of dye. 2. Decreasing temperature. 3. pH 4. Water a polar solvent, contributes to the efficiency of van der Waal’s forces by which the molecules are held together. In tissues, where there is a high concentration of anions e.g. in sulphated mucopolysaccharides, the cationic dye molecules may be held in such close proximity to one another that van der Waal’s forces can exert their influence and cause the dye to polymerize. Consequently the colour changes from blue to red. Tissue components often demonstrated by metachromatic stains:- Amyloid material, Mast cell granules Mucin Cartilage Amyloid Stain -Various stains are used to demonstrate amyloid CRYSTAL VIOLET STAIN FOR AMYLOID:- Aim: To demonstrate amyloid in tissue sections. Principle: Amyloid (a glycoprotein) exhibits metachromasia in tissue sections when stained with crystal violet and other cationic dyes. Control: positive control. Reagents:- Crystal violet solution Stock solution Crystal violet                                          14 gm 95% alcohol                                           100 ml Working solution Stock solution                                      10 ml                                                                                                                                                    Distilled water                                      300 ml                                                                                                                                                Concentrated hydrochloric acid        1 ml Procedure:- *Deparaffinize and bring the sections to water. *Put working crystal violet solution for 1 to 2 minutes and check under microscope. *Rinse in tap water. *Mount in water or in water soluble media. *Put on the coverslip seal the edges with nail polish (Do not let it dry.) Result:- Amyloid                                               purple violet Other tissues                                      blue CONGO-RED STAIN FOR AMYLOID:- Aim:- To demontrate amyloid in tissues. Principle:- Diazo dye attaches itself to amyloid fibrils. The union is affected by H bonds between the OH groups of amyloid and amino side groups of the dye. Congo red dye forms non-polar hydrogen bonds with amyloid. The green birefringence of congo red stained amyloid by polarized light is considered diagnostic of amyloid. Control:- Known positive tissue. Reagents Congo red solution Congo red                            1.0gm Distilled water                     100ml Saturated solution of Lithium Carbonate Lithium carbonate 1.3gm Distilled water 100ml Procedure:- *Bring section to water. *Pour congo red solution for 20 minutes. *Pour off the solution and cover the slide with lithium carbonate for 1.5 minutes to differentiate. *Wash with water. *Counter-stain with hematoxyline for 5 minutes. *Differentiate with 1% acid alcohol. *Wash in running tap water. *Dehydrate, clear in xylene and mount in DPX. Result:- Amyloid                                              bright red which gives apple green birefringence in polarized light. Nuclei                                                 blue Other structures                               unstained to yellow Notes:- 1. Sections must be cut at 8 to 10 microns for birefringence 2. Solution must be filtered through glass wool, not paper filters for birefringence to occur 3. Tissue fixed in solutions other than formalin may display false positive birefringence.

Uncategorized

Microtome Techniques and Applications

INTRODUCTION:- A microtome (from the Greek mikros, meaning “small”, and temnein, meaning “to cut”) is a tool used to cut extremely thin slices of material, known as sections. MICROTOME:- Various types of microtomes are available. Most commonly used microtome for routine histopathology is rotary microtome. The most common applications of microtomes are:- Traditional Histology Technique:- Tissues are hardened by replacing water with paraffin. The tissue is then cut in the microtome at thicknesses varying from 2 to 50 µm. From there the tissue can be mounted on a microscope slide, stained with appropriate aqueous dye(s) after prior removal of the paraffin, and examined using a light microscope. Cryosectioning Technique:- Water-rich tissues are hardened by freezing and cut in the frozen state with a freezing microtome or microtome-cryostat; sections are stained and examined with a light microscope. This technique is much faster than traditional histology (15 minutes vs 16 hours) and is used in conjunction with medical procedures to achieve a quick diagnosis. Cryosections can also be used in immuno histochemistry as freezing tissue stops degradation of tissue faster than using a fixative and does not alter or mask its chemical composition as much. Electron Microscopy Technique:- After embedding tissues in epoxy resin, a microtome equipped with a glass or gem grade diamond knife is used to cut very thin sections (typically 60 to 100 nanometer). Sections are stained with an aqueous solution of an appropriate heavy metal salt and examined with a transmission electron microscope (TEM). This instrument is often called an ultramicrotome. The ultramicrotome is also used with its glass knife or an industrial grade diamond knife to cut survey sections prior to thin sectioning. These sections are of 0.5 to 1 µm thickness and are mounted on a glass slide and stained to locate areas of interest under a light microscope prior to thin sectioning for the TEM. Thin sectioning for the TEM is often done with a gem quality diamond knife. Botanical Microtomy Technique:- Hard materials like wood, bone and leather require a sledge microtome. These microtomes have heavier blades and cannot cut as thin as a regular microtome. Rotary Mictrotome:-  It is most commonly used microtome. This device operates with a staged rotary action such that the actual cutting is part of the rotary motion. In a rotary microtome, the knife is typically fixed in a horizontal position A rotary action of the hand wheel actuate the cutting movement. Here the advantage over the rocking type is that it is heavier and there by more stable. Hard tissues can be cut without vibration. Serial sections or ribbons of sections can easily be obtained. The block holder or block (depends upon the type of cassette) is mounted on the steel carriage that moves up and down and is advanced by a micrometer screw. Auto-cut microtome has built in motor drive with foot and hand control. With suitable accessories the machine can cut thin sections of paraffin wax blocks and 0.5 to 2.0 micrometer thin resin sections. Advantages:- 1. The machine is heavy, so it is stable and does not vibrate during cutting.2. Serial sections can be obtained.3. Cutting angle and knife angle can be adjusted.4. It may also be used for cutting celloidin embedded sections with the helpof special holder to set the knife. In the figure to the left, the principle of the cut is explained. Through the motion of the sample holder, the sample is cut by the knife position 1 to position 2), at which point the fresh section remains on the knife. At the highest point of the rotary motion, the sample holder is advanced by the same thickness as the section that is to be made, allowing for the next section to be made. The flywheel in microtomes can be operated by hand. This has the advantage that a clean cut can be made, as the relatively large mass of the flywheel prevents the sample from being stopped during the sample cut. The flywheel in newer models is often integrated inside the microtome casing. The typical cut thickness for a rotary microtome is between 1 and 60 µm. For hard materials, such as a sample embedded in a synthetic resin, this design of microtome can allow for good “Semi-thin” sections with a thickness of as low as 0.5 µm. Sledge Microtome:- it is a device where the sample is placed into a fixed holder (shuttle), the sledge placed upon a linear bearing, a design that allows for the microtome to readily cut many coarse sections. Applications for this design of microtome are of the preparation of large samples, such as those embedded in paraffin for biological preparations. Typical cut thickness achievable on a sledge microtome is between is 10 and 60 micron. Cryomicrotome:- For the cutting of frozen samples, many rotary microtomes can be adapted to cut in a liquid nitrogen chamber, in a so-called cryomicrotome setup. Thereduced temperature allows for the hardness of the sample to be increased, such as by undergoing a glass transition, which allows for the preparation of semithin samples. However the sample temperature and the knife temperature must be controlled in order to optimise the resultant sample thickness. Ultramicrotome:- A ribbon of ultrathin sections prepared by room temperature ultramicrotomy, floating on water in the boat of a diamond knife used to cut the sections. Theknife blade is the edge at the upper end of the trough of water. An ultramicrotome is a main tool of ultramicrotomy. It can allow for the preparation of extremely thin sections, with the device functioning in the same manner as a rotational microtome, but with very tight tolerances on the mechanical construction. As a result of the careful mechanical construction, the linear thermal expansion of the mounting is used to provide very fine control of the thickness. These extremely thin cuts are important for use with transmission electron microscope (TEM) and Serial Block-Face Scanning Electron Microscopy(SBFSEM), and are sometimes also important for light-optical microscopy. The typical thickness of these cuts is between 40 and 100 nm for transmissionelectron microscopy

Uncategorized

CYTOLOGY : DISPOSAL OF HUMAN WASTE

INTRODUCTION:- Hospital waste is “Any waste which is generated in the diagnosis, treatment or immunization of human beings or animals or in research” in a hospital. Hospital Waste Management means the management of waste produced by hospitals using such techniques that will help to check the spread of diseases through. DISPOSAL OF HUMAN WASTE:-The laboratory should conform to the local practices and guidelines for safedisposal of human and chemical waste generated in the laboratory. WHO MEDICAL WASTE CATEGORIES:- Infectious:- Materials containing pathogens if exposed can cause disease:- Human anatomical waste: waste from surgery and autopsies on patients withinfectious diseases; Sharps: disposable needles, syringes, saws, blades, broken glasses, nails orany other item that could cause a cut; Pathological: tissues, organs, body parts, human flesh, fetuses, blood andbody fluids; Non Infectious (Hazardous):- Pharmaceuticals: drugs and chemicals that are returned from wards, spilled,outdated, contaminated, or are no longer required;  Radioactive: solids, liquids and gaseous waste contaminated with radioactivesubstances used in diagnosis and treatment of diseases like toxic goiter. Non Infectious (Non Hazardous):- Domestic waste: from the offices, kitchens, rooms, including bed linen,utensils, paper, etc Care needs to be taken to dispose off the Infectious and non-infectious hazardouswaste. The non Infectious (Non Hazardous) waste can be disposed off withregular garbage disposal. Cytology laboratory generates waste in the form of remnants of fluids (peritoneal, pleural, cysts, etc), sputum, and left over specimen of liquid cytology. The specimens need to be discarded only after chemical decontamination using at least 1% sodium hypochlorite solution; and then discharged into drains/sewers where it is taken care of by the principle of dilution and dispersal. Any solid waste needs to be disposed off according to hospital waste management. Before disposal the specimen need to be segregated after proper identification. Segregation by color coding system:- Three categories :-Infectious waste – Red bagsDomestic waste – Green BagsSharps – Needle cutters / Puncture proof containers. Transportation:-Containers: puncture proof, leak proof,Bags: sturdy, properly tiedTransport trolleys: designated & timelyStaff protection: provided with protective clothing and other itemsNever put hands in a bag puncture proof, leak proof, The infectious material in red bags will go for incineration:- The sharps can either go to incinerator or following autoclaving/chemicaldisinfection can be mutilated. They should never be thrown in regular garbage. Chemical waste collected throughout the staining, dehydration, clearing andcoverslipping processes must be disposed of or recycled according to state andlocal regulations.

Uncategorized

EXFOLIATIVE CYTOLOGY

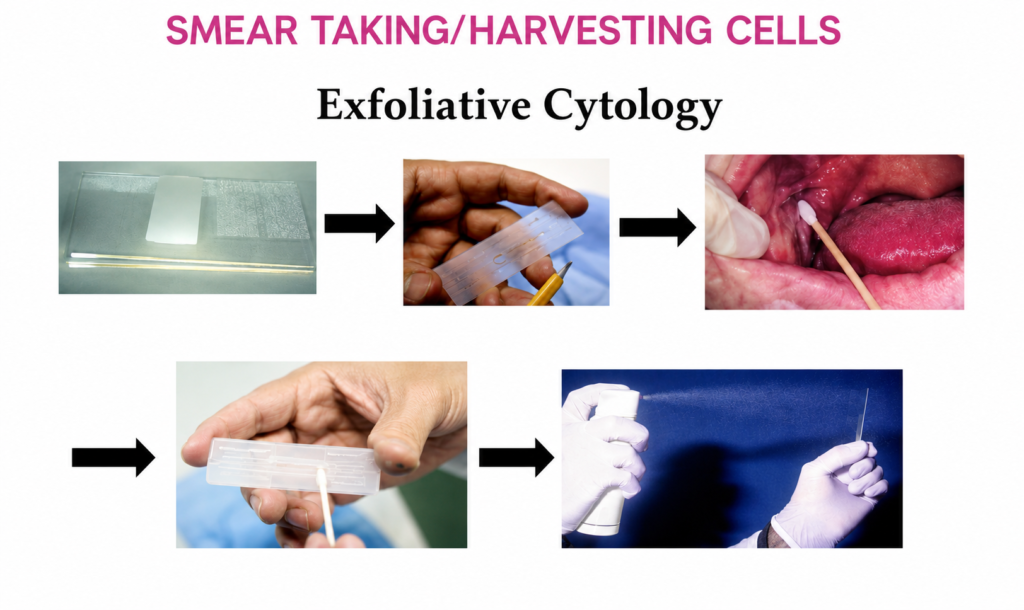
INTRODUCTION:- Exfoliative cytology, which is a quick and simple procedure, is an important alternative to biopsy in certain situations. In exfoliative cytology, cells shed from body surfaces, such as the inside of the mouth, are collected and examined. This technique is useful only for the examination of surface cells and often requires additional cytological analysis to confirm the results. Exfoliative cytology differs from the more precise sampling of known lesions, like needle biopsy. It categorizes collected samples only by analyzing the presence of abnormal or atypical cells, or by showing the presence of malignant cells. When a woman has a pap smear, she may have a result that show atypical cells. If this is the first exfoliative cytology test that shows atypical cells, then usually, the Pap smear is repeated in six to twelve months. If however, repeated showings of atypical cells are present in exfoliative cytology results, further tests may be undertaken to determine if cancerous cells are present. Doctors or dentists may also use exfoliative cytology to check for the presence of cancer in the mouth or throat. The test takes a few skin scrapings and can show the presence of either malignant or atypical cells. Malignant and atypical cells will probably require a person to undergo a biopsy or closer examination of the area in question to rule out cancer. Cytologic examination of a serous effusion is of paramount importance because the finding of cancer cells in such a specimen denotes that the patient has cancer that is not only advanced but also almost always incurable. Apart from the finding of cancer cells, cytologic examination of pleural, peritoneal, and pericardial effusions may also reveal information about inflammatory conditions of the serous membranes, parasitic infestations, and infection with bacteria, fungi, or viruses. COLLECTION METHOD:- In this method, cells are collected after they have been either spontaneously shed by the body (“spontaneous exfoliation”) or manually scraped/brushed off of a surface in the body (“mechanical exfoliation”). An example of spontaneous exfoliation is when cells of the pleural cavity or peritoneal cavity are shed into the pleural or peritoneal fluid. This fluid can be collected via various methods for examination. Examples of mechanical exfoliation include Pap smears, where cells are scraped from the cervix with a cervical spatula, or bronchial brushings, where a bronchoscope is inserted into the trachea and used to evaluate a visible lesion by brushing cells from its surface and subjecting them to cytopathologic analysis. Spontaneous exfoliation: Peritoneal fluid, pleural fluid, pericardial fluid, urine, cysts, washings (peritoneal, bladder) The fluid is collected into a clean, dry container, which need not be sterile, and sent to the laboratory as soon as possible. If the fluid cannot be sent immediately, it should be stored in a refrigerator at 40C and not allowed to freeze. We do not require anticoagulant or fixative to be added to the fluid. The appearance to the naked eye of a serous effusion sometimes reveals clues about the cause of the effusion and the nature of its cellular contents. Therefore, for every serous effusion received by the laboratory, note should be made of its volume, color, clarity, and any unusual physical features, such as malodor, opalescence, or high viscosity Mechanical exfoliation: Cervical pap smear, brushings (Bronchial, gastric, biliary, oral, etc). Cervical smear is a reliable method for diagnosis of cervical cancer. The smears are usually taken in Gynecology ward or OPD, but sometimes patients are sent to laboratory for smear purposes. Patients should be advised NOT to douche, use vaginal medications, or have intercourse 24 hours prior to the pap smear preparation. Patients should NOT schedule pap smear exams during menses. These situations may obscure cellular details or remove diagnostic material from the cervix or vagina. The smear is obtained under direct vision after introduction of speculum. A wooden tongue depressor cut with scissors to fit the contour of cervix may be used. Commercially prepared plastic or wooden scrapers are widely available for this purpose. The scraper is rotated under pressure to 360° for 4-5 full rotations. The material is spread on a pre labelled slide and fixed immediately. Several types of brushes have also been introduced to overcome the disadvantages of scrapers alone (not being able to reach endocervical canal and transformation zone where the carcinomas originate). Brushes are also used to scrape cells in respiratory tract, oral mucosa, esophagus, stomach, duodenum, colon and biliary tract. It is preferable to obtain the brush sample before the biopsy because the latter results in bleeding, which both obscures the lesion, and detracts from the quality of a subsequently collected cytologic sample, whereas interpretation of the biopsy is not affected by the reverse order of collection. Collection of a good brush sample usually requires an experienced assistant, because the operator may well be engaged in maneuvering the end of the scope and holding the lesion in focus while the assistant manipulates the brush. Therefore, it is ideal that a Cytology staff member be present for immediate slide preparation of the specimen. They are all taken under vision- direct or through fibreoptic endoscopy. In all these cases a lot of care needs to be taken to make smear immediately from the brush by gently rotating the brush on slides and fixing them immediately. The material should not be crushed. If liquid-based cytology is used, the head of the broom is detached and dropped into the preservative vial. Once received in laboratory, the usual precautions need to be taken as discussed in specimen receiving, handling and storage. When only one slide is received, it should be preferable to stain it with Papanicolaou stain. When multiple slides are received- some are air dried (stain with MGG, special stains, etc) and some are wet fixed (stain with Papanicolaou). The liquid specimens need to be commented upon the volume, color and turbidity. Specimens need to be centrifuged and cytocentrifuged depending on cellularity. After concentrating they can be used for both air dried smears and wet fixation.

Histopathology, Uncategorized

Electron Microscope Diaries

INTRODUCTION:- Electron Microscopes were developed due to the limitations of Light Microscopes which are limited by the physics of light to a resolution of about 0.2 micrometers. In the early 1930’s this theoretical limit had been reached and there was a scientific desire to see the fine details of the interior structures of organic cells (nucleus, mitochondria…etc.). This required 10,000x plus magnification which was just not possible using Light Microscopes. The Transmission Electron Microscope (TEM) was the first type of Electron Microscope to be developed and is patterned exactly on the Light Transmission Microscope except that a focused beam of electrons is used instead of light to “see through” the specimen. The electron microscope was invented in 1931 by Germans Ernst Ruska and Max Knoll. Ernst Ruska later received Nobel Prize for his work in 1986. Conventional transmission electron microscope (TEM) today can achieve a resolution of 0.05nm. TRANSMISSION ELECTRON MICROSCOPE :- The original form of electron microscope, the transmission electron microscope(TEM) is the direct counterpart of conventional light microscope. It uses a highvoltage electron beam to create an image. The electron beam is produced by anelectron gun, commonly fitted with a tungsten filament cathode as the electron source. The electron beam is accelerated by an anode typically at +100 keV (40 to 400 keV) with respect to the cathode, focused by electrostatic and electromagnetic lenses, and transmitted through the specimen that is in part transparent to electrons and in part scatters them out of the beam. When it emerges from the specimen, the electron beam carries information about the structure of the specimen that is magnified by the objective lens system of the microscope. The spatial variation in this information (the “image”) may be viewed by projecting the magnified electron image onto a fluorescent viewing screen coated with a phosphor or scintillator material such as zinc sulfide. Alternatively, the image can be photographically recorded by exposing a photographic film or plate directly to the electron beam. It is the direct counterpart of conventional light microscope. The most obvious differences between TEM and light microscope are the: the ‘light’ source, the form of the lenses and the manner in which image is formed. The Electron beam:- This is the source of ‘light’ in an EM, which can be generated by thermionic emission from a tungsten filament using an electron gun. Electrons are produced by passing a heating current through the filament.In some microscopes, the beam can be generated by field emission. Electromagnetic Lenses:– The lenses in EM are electromagnetic coils. To focus an electronic beam into a given plane, the current passing through the coil is changed. Thus the focal length of these so called lenses can be infinitely variable. Image formation:-  In a light microscope, image formation occurs due differential absorption of light rays. In EM, the image is formed partly by differential absorption and partly by scattering. Scanning Electron Microscope (SEM):- The SEM is an instrument that produces a largely magnified image by using electrons instead of light to form an image. A beam of electrons is produced at the top of the microscope by an electron gun. The electron beam follows a vertical path through the microscope, which is held within a vacuum. The beam travels through electromagnetic fields and lenses, which focus the beam down toward the sample. Once the beam hits the sample, electrons and X-rays are ejected from the sample. Detectors collect these X-rays, backscattered electrons, and secondary electrons and convert them into a signal that is sent to a screen similar to a television screen. This produces the final image. Tissue Processing for Electron microscope:- To study the specimen with electron microscope, a series of processing steps are required whichare similar but different to light microscopy. The steps involved are fixation,dehydration, embedding, cutting and positive staining with heavy metals. Specimen Handling & Fixation:- The specimen must be exposed to fixative as soon as possible after interruption of blood supply. Slices of tissues about 1-2 mm thick should be cut andtransferred to a container containing fixative. The most popular method of fixation used is double fixation. It involves primary fixation in an aldehydefollowed by secondary (post) fixation in osmium tetroxide. Glutaraldehyde is the most popular aldehyde for fixation of tissues for electron microscopy as itreacts rapidly with proteins and stabilises structures by cross-linking before there is any opportunity for extraction by the buffer . Hence more ground substance of the cytoplasm (glycogen) and of the extracellular matrices is preserved. But, glutaraldehyde alone is not an adequate fixative, since certain cell components especially lipids, are not fixed and may be extracted during dehydration, therefore secondary fixation is required using osmium tetroxide. Depth ofpenetration of glutaraldehyde is 2 – 3 mm / hour and of osmium tetraoxide is 1mm/hour. Dehydration:- The aim of dehydration is to remove all the free water in the fixed tissue and replace it with a solution miscible(soluble) with embedding medium. We usually use organic solvents like methanol, ethanol or acetone. It starts with distilled water to 40% ethanol and then through a series of increasing concentrations of ethanol to 100% ethanol. Protocol for dehydration in ethanol:- 1. 40% ethanol, 5 min.  2. 70% ethanol, 10 min. 3. 90% ethanol, 10 min  4. 100% ethanol, 3 x 10 min. 5. If ethanol is miscible (soluble) with the embedding medium then tissue is directly transferred to it. Otherwise, another transitional fluid may be required.Epoxypropane is most commonly used transitional fluid. Embedding Media:- The embedding media for EM are resins, polyester resins and methacrylates. For general electron microscopy epoxy resins have most properties required. Epoxy resin  Characteristics:- (a) Polyaryl ethers of glycerol with terminal epoxy groups. (b) Transparent yellowish resins which range from viscous liquids to fusiblesolids.  (c) Require addition of curing agents to convert them to a tough, extremely adhesive and highly inert solid. Polymerization accomplished by the addition of various bifunctional setting groups which link with the resinto produce a three-dimensional structure. Embedding :- The embedding is carried out in polythene capsules

Histopathology, Uncategorized

The Art of Exhibition (museum magic)

Introduction:- All teaching hospitals and colleges of Pathology have Museums which serve many functions: permanent exhibition of common specimen for undergraduate and postgraduate teaching purposes, illustrating specimens of rarity, permanent source of histologic material and for gross and microscopic photography. BASIC MUSEUM TECHNIQUES :- Any specimens for museum are handled by following steps:- 1. Reception 2. Preparation 3. Fixation 4. Restoration 5. Preservation 6. Presentation Reception of the Specimen:- Any specimen received in the museum should be recorded in a Reception book and given a number followed by year (e.g. 32/2013). This number will stay with specimen even after it is catalogued in its respective place. This number is written on tie-on type label in indelible (permanent) ink and is firmly attached or stitched to the specimen. The reception book should contain all necessary information about the specimen. Preparation of the specimen:- An ideal specimen is received fresh in unfixed state. However, it is mostly obtained from pathology laboratory after being examined, thus will already be formalin fixed. If planning to use a specimen for museum, part of it can be kept without disturbing for museum, e.g. in kidney it can be bisected and one half kept aside for museum.  Fixation of the specimen:- The objective of fixation is to preserve cells and tissue constituents in as close a life-like state as possible and to allow them to undergo further preparative procedures without change. Autolysis and bacterial decomposition and stabilizes the cellular and tissue constituents. The fixatives used in museums all over the world are based on formalin fixative technique, and are derived from Kaiserling technique and his modifications. its recommended that the initial fixation be a neutral formalin (KI) solution and then transferred to a final preserving glycerin solution (KIII) for long term display. Colour preservation is also maintained with these solutions. Kaiserling’s Technique:- Fixation of specimen:- The specimen needs to be kept in a large enough container which can accommodate specimen along with 3-4 times volume of fixative. Specimen is stored in the Kaiserling I Solution for 1 month depending on the size of the specimen. The specimen should not rest on bottom or an artificial flat surface will be produced on hardening due to fixation. Kaiserling I Solution:- Formalin                                    1L Potassium acetate                  45 g Potassium nitrate                    25 g. Distilled water                          Make up to 10 litres. Restoration of specimen:- It is required to restore the specimens, as they lose their natural color on fixation.The recommended method is the Kaiserling II method. It involves removing the specimen, washing it in running water and transferring to 95% alcohol for 10 minutes to 1hour depending on the size of specimen. The specimen is then kept and observed for color change for around 1- 1.5 hrs. After this step, specimen is ready for preservation. Kaiserling II Solution:- Alcohol 95% *Store specimen in this solution for 10 minutes to 1 hour depending on size of specimen. Rejuvenator Solution:- Pyridine                                          100 ml Sodium hydrosulphite                 100 gm Distilled water                               4 liters *Formalin decreases the natural colour of the specimen. However, rejuvenator solution restores the colour. Preservation of specimen:- The recommended solution for this step is Kaiserling III. This is the final solution in which the specimen will remain for display. It is based on glycerine solution. Kaiserling III Solution:- Potassium acetate          1416 g. Glycerine                            4 liters Distilled water                   make up to litres Thymol crystals added to prevent moulds. * Leave solution to stand for 2 – 3 days before using to ensure proper mixing of chemicals. Add 1% pyridine as stabilizer. This solution acts as permanent fixative. This solution easily turns yellowish and needs to be replaced to restore colour of the specimen. The specimen will initially float to surface but later sink to bottom. Presentation of the Specimen:- Initially all museum specimens were mounted in cylindrical jars and sealed with sheep bladder walls. Later they were replaced by rectangular glass jars. They were better than cylindrical ones as the flat surfaces afforded a clear view of specimens without any distortion. They are covered by rectangular glass plates. These jars can be purchased readymade or assembled in museum itself, as per need. Nowadays, Perspex jars are also available, which are lighter than glass jars. However, they cannot be used to store specimens fixed in alcohol or methyl salicylate as they react with plastics. Mounting the Specimens:-  To support the specimen within its jar, it is attached to the specimen plate or rectangular bent glass rods. It can be done by tying the specimen with nylon threads. Double knots should be made by threads, on the specimen surface. -:Museum specimens of cardiovascular system:- l

Uncategorized

Cavities of the body

  The human body cavity is a fluid-filled space inside the body that holds and protects internal organs. The body maintains its internal organization by membrane,sheaths,and other structure that separate the compartments. The two main divisions are the dorsal cavity (posterior) and ventral  cavity  (anterior).These cavities protect the lungs,heart,stomach,and intestines for example can expand and contract without distorting other tissues or disrupting the activity of nearby organs. The posterior (dorsal) cavity has two main subdivisions:- 1.cranial cavity :- The cranial cavity is the hollow space inside the skull  and protects the brain.The cranial cavity contains the brain,protective membranes called meninges. cerebrospinal fluid (CSF) blood vessels supplying the brain.its called as houses of the brain.its formed by the bones of the skull especially the cranium protected by skull and cerebrospinal fluid. Functions of the Cranial Cavity:- Brain Protection: The solid, bony walls (calvarium) and fluid-filled membranes act as a shock-absorbing enclosure for the brain, cerebellum, and brainstem. Structural Support: The base of the skull forms the floor, consisting of the anterior, middle, and posterior cranial fossae, which provide a stable, shaped foundation where different parts of the brain rest. Muscular Attachment: The exterior surface of the cavity provides anchoring points for muscles, including the temporalis muscle, which is vital for jaw movement.  Environmental Stability: It creates a stable, insulated environment necessary for delicate brain functions, including the regulation of temperature, hormonal signals via the pituitary gland, and blood flow. vertibral cavity:-The spinal cavity (vertebral cavity) encloses the spinal cord .its a long, narrow space inside the vertebral column (backbone) Protected by the vertebral column and cerebrospinal fluid.It extends from the base of the skull to the lower back.the vertibral cavity main function is protect the spinal cord from injury and provides a pathway for spinal nerves.its supports communication between the brain and the rest of the body through the nervous system. Functions of the Vertebral Cavity:- Protection: The primary function is to serve as a strong bony encasement for the delicate spinal cord, protecting it from injury. Support & Structure: It forms a rigid central axis for the trunk, providing a safe housing for nerve tissue while supporting the body’s upright posture. Path for Nerves: The cavity enables nerve roots to pass out through the intervertebral foramina, facilitating connection to the peripheral nervous system. Space and Cushioning: It provides a contained space for the spinal cord, which is padded and held in place by cerebrospinal fluid and the meninges. Accommodation of Structure: The cavity allows for flexibility and movement of the vertebral column while maintaining the structural integrity of the spinal cord.   The anterior (ventral) cavity has two main subdivisions:- 1.Thoracic cavity:-The thoracic cavity is situated between the neck and diaphragm in the upper part of the trunk.its boundaries are formed by the thoracic cage and supporting muscles.contain vital organs involved in respiration and circulation.(like-Trachea,2 bronchi,2 lungs,Heart, aorta, superior and inferior venacavae,blood vessels, oesophagus. The thoracic cavity is divided into three main compartments:- A. Right Pleural Cavity:- It contain the right lungs lined by  pleura. B. Left Pleural Cavity :-  It contain the left lungs also lined by pleura. C. Mediastinum (central compartment):-The Mediastinum is  space between the  lungs including the structures found there,sach as- heart oesophagus, and blood vessels Function of Thoracic cavity:- Protection: The rib cage, sternum, and thoracic vertebrae form a rigid, bony structure that shields vital organs such as the heart and lungs from injury. Respiration Facilitation: The cavity is designed for breathing (pulmonary ventilation). The diaphragm and intercostal muscles work to change the volume of the thoracic cavity, creating pressure changes that move air into and out of the lungs. Support & Movement: The cavity provides a stable anchor for the arms and protects the superior thoracic aperture (neck area), while remaining flexible enough for the torso to bend and twist. Organ Housing: It contains key cardiovascular components (heart, great vessels), respiratory components (lungs, trachea, bronchi), and the esophagus 2. Abdominopelvic  cavities:-The abdominopelvic cavity is a large body cavity located below the diaphragm and above the pelvic floor is commonly divided into two parts: Abdominal cavity – the upper portion Pelvic cavity – the lower portion A.Abdominal cavity–The abdominal cavity is the upper part of the abdominopelvic cavity. The abdominal cavity is a large,fluid-lined body space that houses and protects the vital organs like-digestive,urinary,and reproductive organs. its the large hollow space in the body located between the chest(Thoracic cavity) and the pelvis. By convention,the abdominal cavity is divided into the nine regions:- 1.Epigastric region 2.Umbilical region                                                                                                                                                                                                                                                    3.Hypogastric region                                                                                                                                                                                                                                                          4. Left hypochondriac region         

Scroll to Top