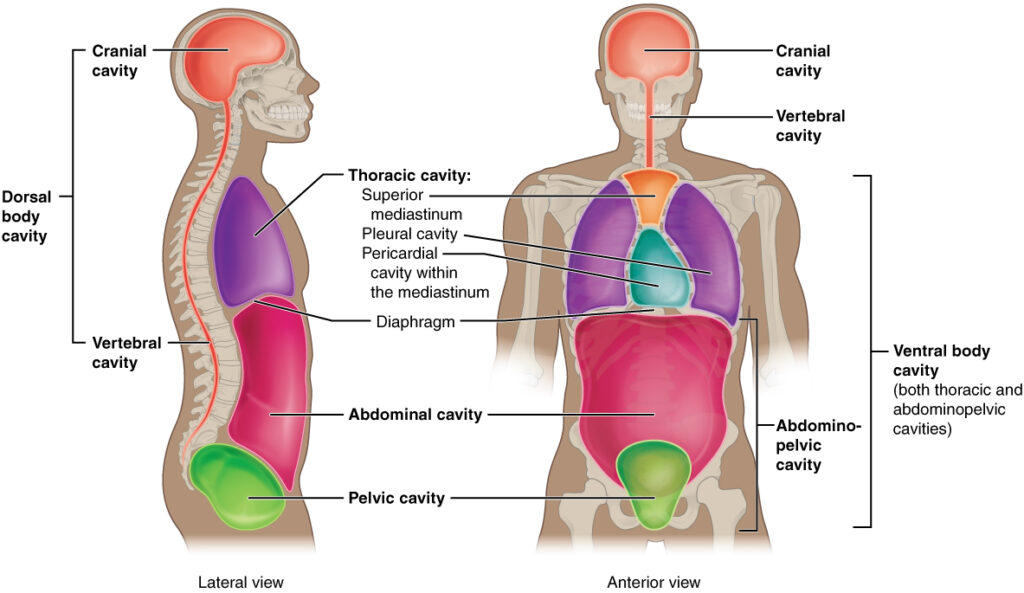
Uncategorized

Uncategorized

METACHROMATIC STAINING

INTRODUCTION:- There are certain basic dyes belonging to aniline group that will differentiate particular tissue components by giving them a different color to that of original dye. The phenomenon is known as metachromasia. Some of the common metachromatic dyes are:  *Methylene blue, Methyl violent                                                                                                                                *Thionin, Crystal violet ,                                                                                                                                            *Toluidine blue Metachromasia :- takes place when certain negatively charged groups on the tissue react with cationic dyes. On polymerization the original colour of the dye changes to another colour (eg mast cell stain pink with toluidine blue). Thionin and toluidine blue dyes are commonly used for quick staining of frozen selection using their metachromatic property to stain nucleus and cytoplasm differently. Metachromasia is enhanced when intermolecular distances are reduced.  Factors which enhance metachromasia are 1. Increasing concentration of dye.  2. Decreasing temperature.  3. pH  4. Water a polar solvent, contributes to the efficiency of van der Waal’s forces by which the molecules are held together. In tissues, where there is a high concentration of anions e.g. in sulphatedmucopolysaccharides, the cationic dye molecules may be held in such closeproximity to one another that van der Waal’s forces can exert their influence andcause the dye to polymerize. Consequently the colour changes from blue to red. Tissue components often demonstrated by metachromatic stains: *Amyloid material, Mast cell granules.                                                                                                                           *Mucin Cartilage Amyloid Stain -Various stains are used to demonstrate amyloid  CRYSTAL VIOLET STAIN FOR AMYLOID:-  Aim: To demonstrate amyloid in tissue sections. Principle: Amyloid (a glycoprotein) exhibits metachromasia in tissue section when stained with crystal violet and other cationic dyes. Control: ositive control ReagentsCrystal violet solutionStock solutionCrystal violet                                         14 gm95% alcohol                                           100 mlWorking solutionStock solution                                        10 mlDistilled water                                        300 mlConcentrated hydrochloric acid         1 ml  Procedure:-  Deparaffinize and bring the sections to water. Put working crystal violet solution for 1 to 2 minutes and check undermicroscope. Rinse in tap water. Mount in water or in water soluble media. Put on the coverslip seal the edges with nail polish (Do not let it dry.) Result:- Amyloid                             purple violetOther tissues                    blue CONGO-RED STAIN FOR AMYLOID Aim: To demontrate amyloid in tissues. Principle: Diazo dye attaches itself to amyloid fibrils. The union is affected byH bonds between the OH groups of amyloid and amino side groups of the dye.Congo red dye forms non-polar hydrogen bonds with amyloid. The greenbirefringence of congo red stained amyloid by polarized light is considereddiagnostic of amyloid. Control: Known positive tissue Reagents:-Congo red solution Congo red                                         1.0gmDistilled water                                  100ml Saturated solution of Lithium Carbonate Procedure:- *Bring section to water. *Pour congo red solution for 20 minutes. *Pour off the solution and cover the slide with lithium carbonate for 1.5 minutes to differentiate. *Wash with water. *Counter-stain with hematoxyline for 5 minutes. *Differentiate with 1% acid alcohol. *Wash in running tap water. *Dehydrate, clear in xylene and mount in DPX. Result :- Amyloid                                                              bright red which gives apple green birefringence in polarized light.Nuclei                                                                 blueOther structures                                               unstained to yellow Notes :- 1. Sections must be cut at 8 to 10 microns for birefringence  2. Solution must be filtered through glass wool, not paper filters for birefringence to occur  3. Tissue fixed in solutions other than formalin may display false positive birefringence

Histopathology, Uncategorized

Decalcification in histology

INTRODUCTION:- The presence of calcium salts in tissues makes them hard. This causes damage to the knife, difficulty in cutting tissue. Calcium is normally present in bones and teeth. Calcium may also be present in normal tissues in pathological conditions like necrotic tissue in tuberculosis. OBJECTIVES:- After reading this lesson, you will be able to:  *describe decalcification *explain different methods of decalcification *describe the chemical and physical tests to estimate the remaining calcium. DECALCIFICATION:- Aim – To remove calcium salts from the tissues and make them amenable for sectioning.  Preparation of tissues – The calcified hard tissues should be first cut into small pieces (2 to 6mm) with a thin blade, hacksaw or sharp knife in order to minimize the tearing of the surrounding tissues. This process is followed by fixation in buffered formalin or any other desired fixative. After fixation tissues must be thoroughly washed and excess fixative should be removed before the specimen is subjected to decalcification. DIFFERENT METHODS OF DECALCIFICATION:- 1. Acid decalcification 2. Ion exchange resin 3. Electrical ionization 4. Chelating methods 5. Surface decalcification Decalcification process should satisfy the following conditions *Complete removal of calcium salts *Minimal distortion of cell morphology *No interference during staining Decalcification is a straightforward process but to be successful it requires: *A careful preliminary assessment of the specimen *Thorough fixation *Preparation of slices of reasonable thickness for fixation and processing *The choice of a suitable decalcifier with adequate volume, changed regularly *A careful determination of the endpoint *Thorough processing using a suitable schedule. Methods of Decalcification :- The tissue is cut into small pieces of 3 to 5 mm size. This helps in faster decalcification. The tissue is then suspended in decalcifying medium with waxed thread. The covering of wax on thread prevents from the action of acid on thread. The volume of the decalcifying solution should be 50 to 100 times of the volume of tissue. The decalcification should be checked at the regular interval. Acid Decalcification – This is the most commonly used method. Various acid solutions may be used alone or in combination with a neutralizer. The neutralizer helps in preventing the swelling of the cells. Following are the usually used decalcifying solutions- 1. Aqueous Nitric Acid:- Nitric acid              –         5ml Distilled water       –        100 ml If tissue is left for long time in the solution, the tissue may be damaged. Yellow colour of nitric acid should be removed with urea. But this solution gives good nuclear staining and also rapid action. 2. Nitric Acid Formaldehyde Nitric acid                 – 10 ml Formaline                 – 5-10 ml                                                                                                                        Distilled water upto 100 ml Advantages   * Rapid action *Good nuclear staining *Washing with water is not required *Formalin protects the tissues from maceration 3. Formic Acid Solution: Formic acid                   – 5  ml Distilled water              – 90 ml Formalin                       –  5 ml In this solution the decalcification is slow. If concentration of formic acid is increased the process is fast but tissue damage is more: 4. Trichloroacitic Acid – This is used for small biopsies. The process ofdecalcification is slow hence cannot be used for dense bone or big bony pieces. Formal saline (10%)                 –      95 ml Tricloroacitic acid                    –      5 gm Ion Exchange method – In these ammonium salts of sulfonated polystyrene resin is used. The salt is layered on the bottom of the container and formic acid containing fluid is filled. The decalcifying fluid should not contain mineral acid. X-rays can only determine complete decalcification. The advantages of this method are:- *Faster decalcification *Well preserved tissue structures *Longer use of resin Electrolytic Method – Formic acid or HCl are used as electrolytic medium. The calcium ions move towards the cathode. Rapid decalcification is achieved but heat produced may damage the cytological details. Chelating Agents:- Organic chelating agents absorb metallic ions. EDTA can bind calcium forming a non-ionized soluble complex. It works best for cancerous bone. This is best method for decalcification of bone marrow biopsies as it preserves cytological details best. The glycogen of marrow is preserved. EDTA Solution :- EDTA                                    –                 5.5 gm Formaline                          –                  100 ml Distilled water-                 –                   900 ml Surface Decalcification – The surface layer of paraffin blocks are inverted in5% HCl for one hour. About top 30 micron is decalcified. It should be washed thoroughly before cutting. Factors affecting rate of Decalcification:- 1. Concentration of decalcifying solution-Increased concentration of the decalcifying agent fastens the reaction. 2. Temperature-The rate of decalcification increases with rise of temperature. 3. Density of bone-Harder bone takes longer time to decalcify. 4. Thickness of the tissue-Small tissue pieces decalcify earlier. 5. Agitation-Agitation increases the rate of decalcification. METHODS OF DETERMINING OPTIMUM DECALCIFICATION OR ENDPOINT:-  Specimens should NOT be crowded together and should NOT contact the bottom of container in order to provide complete decalcification. Over decalcification can also permanently damage specimen. The following procedure help determine the correct end-point of decalcification. End-Point of Decalcification: X-ray (the most

Uncategorized

RAITMAN- FRANKEL CALORIMETRIC (SGOT)

SERUM SGOT SUMMERY:-     Serum Glutamate Oxaloacetate Transaminase (SGOT), also called as Aspartate aminotransferase (AST), belongs to the transferase class of enzymes. This enzyme shows high levels of activity in the heart, liver, skeletal muscles and kidneys. Since its level seems to be increasing enormously following Myocardial Infarction (MI), it can be used as supporting evidence in the diagnosis of MI (Especially 20-36 hrs after MI). Elevated levels are also seen in Viral / Toxic Hepatitis, Hepatic and Cardiac Necrosis, Muscular Dystrophy and Pulmonary Embolism. AIM:- Determination of Serum Glutamate Pyruvate Transaminase (SGPT or ALT) by Reifman & Frankel’s method  PRINCIPLE:- Alanine aminotransferase (GPT) catalyzes the transfer of the amino group from alanine to oxoglutarate with the formation of glutamate and pyruvate.   L-Aspartate + 2-Oxogluatarate                      GPT            Oxaloacetate +L-Glutamate        Oxaloacetate + 2,4 DNPH                                              Brownish red colored complex SGOT (AST) catalyses the transfer of amino group from Aspartic acid to 2- Oxoglutarate to form Oxaloacetate and L-Glutamate. The Oxaloacetate thus formed reacts with 2,4 Dinitrophenyl Hydrazine (2,4 DNPH) to form a corresponding Hydrazone, a brownish red colored complex in an alkaline medium.The color intensity is directly proportional to the SGOT concentration in the serum and is measured photometerically at 505 nm (490- 546).    REQUIREMENTS:-     ·        Four test-tube, ·        Colorimeter, ·        SGOT Reagent Kit, ·        Incubator, ·        Cuvette, ·        Pipette etc. ·        Fresh Serum PROCEDURE:-   1.      Pipette into test tubes labeled as Blank, Calibrator, Control, Test and proceed as per given below       Reagent Blank Calibrator Control Test Substrate Reagent 0.25 ml 0.25 ml 0.25 ml 0.25 ml Deionized Water 50µl       Serum Sample       50µl Calibrator (Conc. 170 U/L)   50µl      1.      Mix and incubate at 37ºC for 60 minutes. Color Reagent 0.25 ml 0.25 ml 0.25 ml 0.25 ml Serum Sample (Same Serum Sample Which isused above)     0.05 ml   1.      Mix and incubate at 37ºC for 20 minutes. Alkaline Reagent (Prediluted) 1.5 ml 1.5 ml 1.5 ml 1.5 ml 1.      Read absorbance of all the tubes against distilled water at 505 nm(490-546).   Calculation:-:- SGOT (AST) activity in U/L =                 Abs of Test – Abs of Control  x Conc of Calibrator (Conc :160 U/L)                              Abs of Calibrator– Abs of Blank Then,    If Absorption of,        Test                       =             0.35                                      Control                 =             0.30                                      Calibrator            =             0.36                                     Blank                     =             0.05 Then,  SGOT (AST) activity in U/L =            Abs of Test – Abs of Control      xConc of Calibrator (Conc :160 U/L)                                                       Abs of Calibrator– Abs of Blank Then,       SGOT (AST) activity in U/L =            0.35 –0.30  x 160 U                                                                 0.36 – 0.5          SGOT(AST) activity in U/L =          25.8   Result (U/L)                        =             25.8 NORMAL VALUE:-        =          0-35 U/L                    CLINICAL SIGNFINANCE The group of enzymes called transaminase exist in tissues of many organs. Necrotic activity in these organs causes a release of measured. Since heart tissue is rich in AST increased serum levels appear in patients after myocardial infraction, as well as in patients with muscle disease. Muscular dystrophy and dermatomyositis . The liver is especially rich in ALT, being this enzyme measurement used primarily as a test for infectious and toxic hepatitis, although high levels of both ALT and AST may also be found in cases of liver cell damage and acute pancreatitis, suggesting that the obstruction of billary tree by the adematous pancreas and the presence of associate hepatic disease may contribute to elevated AST levels these patients. Slight or moderate elevations of AST and ALT activities may be observed after intake of alcohol and after administration of various drugs, such as salicylates, opiates, and ampicilin

Microbiology, Uncategorized

Methyl Red Test FOR ENTEROBACTERIA

METHYL RED TEST :- This test is performed to differentiate Enterobacteria. v  Principle:- Some Enterobacteria when cultured in buffered glucose peptone water, ferment glucose to produce sufficient acidity, which gives a red color with methyl red indicator (pH range: 4.4-6.2. Color change: red to yellow). v Procedure:- 1.      Inoculate a colony of the test organism into 0.5 ml of sterile glucose phosphate broth. 2.      Incubate overnight at 35-37°C. 3.      Add a drop of methyl red indicator and observe the color. v Observations:- 1        Bright red color                  :                Positive test 2        Yellow/orange color         :                 Negative test v Quality control:- Use following microorganisms to confirm the reliability of reagents: Positive control      :               E. coli Negative control    :               Klebsiella aerogenes

Microbiology, Uncategorized

NITRATE REDUCTION TEST

NITRATE REDUCTION TEST:- This test helps to differentiate bacteria that produce the enzyme nitrate reductase from the bacteria that do not produce the enzyme. This test is also helpful in differentiating Mycobacterium species. v      Principle:-       The test organisms are incubated in a broth containing nitrate. The nitrate reductase producing organisms reduce nitrate to nitrite, which is tested by adding sulfanilic acid reagent and a-naphthylamine. The formation of pink red compound indicates positive reaction.    v Requirements:-        1.      Nitrate broth         2.      Sulfanilic acid reagent                 a) Glacial acetic acid                        : 5.7 ml  b) Distilled water                              :  14.3 ml c) Sulfanilic acid                                :  0.16 g  3. alfa-naphthylamine  reagent a) Glacial acetic acid                        :  5.7 ml b) Distilled water                               : 14.3 ml c) Sulphonic acid                               :0.16 g v     Procedure:- 1.      Incubate the nitrate broth (sterile) with test organism. 2.      Incubate at 37°C for four hours 3.      Add one drop of sulfanilic acid reagent. 4.      Add one drop of a naphthylamine reagent. 5.      Mix well and observe the reaction   v Observations:-        Red color                            : Positive test         No red color                       :No reduction of nitrate   v Additional information:-      When nitrate is not detected it is necessary to test whether the organism has reduced the nitrate beyond nitrite to nitrogen gas or ammonia. Zinc dust (knife point), small amount is added, which will convert any nitrate to nitrite. In that case the observation is as follows:       Red color             : Negative test       No red color        : Positive test v    Quality control:- Use the following microorganisms to confirm the reliability of reagents:- Positive control        : E.coli Negative contro l      : Acinetobacter sp.

Microbiology, Uncategorized

INDOLE TEST FOR BACTERIA IDENTIFICATION

INDOLE TEST :- This test is important in the identification of enterobacteria such as E.coli, P. vulgaris, P. rettgeri, etc. v Principle:- The test organism is cultured in a medium containing tryptophan. The organisms break down tryptophan and indole is released. It is detected by the action of Kovac’s or Ehrlich reagent (formation of red colored compound. This test can also be performed by culturing the organism in tryptone water or peptone water containing tryptophan. Indole production is detected as described above). v   Requirements:- 1.      Motility indole urea (MIU) medium 2.      Kovac’s reagent strips (or Kovac’s reagent) Kovac’s Reagent v  Formula and preparation:- 1. p-dimethylaminobenzaldehyde            :        2.0 g 2. Isoamyl alcohol                                       :       30 ml 3. Concentrated hydrochloric acid           :       10 ml Dissolve ingredients 1 and 2 in 10 ml of concentrated hydrochloric acid and store in a brown bottle. v Procedure:- 1.      Inoculate MIU medium with test organism colonies. 2.   Incubate at 37°C by placing Kovac’s reagent strip in the neck of the MIU tube and 3 .       Look for reddening of the lower part of the test strip (or formation of red color of the reaction mixture). v Results:-  1. Reddening of strip                  : Positive test 2  No red color                              : Negative test v Quality control:- Use following microorganisms to confirm the reliability of reagents Positive control: Escherichia coli Negative control: Klebsiella aerogenes

Microbiology, Uncategorized

UREASE TEST FOR BACTERIA

Proteus strains are strong urease producers. Salmonellae and Shigellae do not produce urease. This test helps in differentiating enterobacteria. v    Principle:-  The test organisms are cultured in MIU medium (or in Christensen’s urea broth). If the strain produces urease, it acts on urea, and ammonium carbonate is formed with the release of ammonia. The medium becomes alkaline and the color of the medium changes to red pink. v  Requirements:- 1.      Motility Indole Urea (MIU) medium. 2.       Test tubes (15 x 125 mm) v  Procedure:- 1.      Inoculate MIU medium with acolony of the test organism. 2.      Incubate at 35°C overnight. 3.      Examine the medium by looking for a red pink color. v    Observations:- 1.     Red-pink medium       :  Positive test 2.     No red pink color        :  Negative test v  Quality control:-    Use the following microorganisms to confirm the reliability of reagents:-    Positive control     :           Klebsiella aerogenes    Negative control    :         E. coli

Microbiology, Uncategorized

BILE SOLUBILITY TEST

1.    Bile Solubility Test:- This test helps to differentiate S. pneumoniae from iridans streptococci.     v Principle:-        The test organisms are emulsified in normal saline. It gives a turbid suspension. The bile salt sodium deoxycholate is then added. S. pneumoniae organisms are soluble in bile salts and it is indicated by the clearing of turbidity. Viridans streptococci are insoluble in bile salts and it is indicated by persistence of the turbidity.    v Requirements:-        1.      10 g/dl sodium deoxycholate in 0.85 g/dl, sodium chloride.        2.  Normal saline.  3.   Test tubes (15 x 125 mm). v Procedure:- 1.      Pipette 2 ml of normal saline in a test tube. 2.      Suspend several colonies in the saline. 3.      Divide the suspension between two tubes. 4.      To the tube labeled as ‘T’, add 2 drops of sodium deoxycholate reagent, and to the tube labeled as ‘C’ add 2 drops of sterile distilled water. Leave both the tubes for 10-15 minutes. 5.      Observe the tubes. v Observation:- 1.      Clearing of turbidity: Probably S. pneumoniae. 2.      No clearing of turbidity: The organism is probably not S. pneumoniae.     v Quality control:-                Use the following microorganisms to confirm the reliability of reagents: Positive control: Streptococcus pneumonia                Negative control: Enterococcus fecalis  

Biochemistry, Uncategorized

SERUM DIRECT AND INDIRECT BILIRUBIN

SERUM DIRECT BILIRUBIN:-   Aim: – Determination of Serum Direct Bilirubin by DMSO method & Malloy and Evelyn method Summary:- Bilirubin is a breakdown product of hemoglobin, insoluble in water. It is transported from the spleen to the liver and excreted into bile. Hyperbilirubinemia results from the increase of bilirubin concentrations in plasma. PRINCIPLE:-   Bilirubin is converted to colored azobilirubin by diazotized sulfanilic acid and measured photometrically. Of the two fractions presents in serum, bilirubin-glucuromide and free bilirubin loosely bound to albumin, only the former reacts directly in aqueous solution (bilirubin direct), while free bilirubin requires solubilization with dimethylsulphoxide (DMSO) to react (bilirubin indirect). In the determination of indirect bilirubin, the direct is also determined; the results correspond to total bilirubin. The intensity of the color formed is proportional to the bilirubin concentration in the sample.  REQUIREMENTS:-   *Two test-tube, *Colorimeter, Bilirubin *Direct Reagents,  *Incubator, *Cuvette, *Pipette etc. *Fresh Serum. PROCEDURE-   1.      Adjust the instrument to zero with distilled water. 2.   Pipette into a cuvette or test tube: Contents Blank Test Direct Bilirubin Reagent (R2) 1.5 ml 1.5 ml Working Reagent (R3) – 50µl Sample /Calibrator 50µl 50µl 1.      Mix and incubate for exactly 5 minutes at room temperature.        2.      Read the absorbance (A). at 546 nm wavelength. Calculation:-  With Factor: Direct Bilirubin (mg/dl) =              (A) Sample – (A) Sample Blank x Factor Theoretical Factor Direct bilirubin = 14 Direct Bilirubin (mg/dl)  =             (A) Sample – (A) Sample Blank x 14 After Testing, If, (A) Sample = 0.21 (A)   Sample Blank = 0.16                                                                  =             0.05 X 14                                                                  =             0.7 mg/dl    D. Bilirubin in mg/dl to µmol/L   =             mg/dL x 17.1 =          0.7 X 17.1 =          11.97 µmol/L Normal Value:-    Direct Bilirubin (mg/dl)           =         <0.3 mg/dl Clinical Significance:-  Causes of hyperbilirubinemia:- Direct bilirubin: Hepatic cholestasis, genetic errors, hepatocellular damage. Indirect bilirubin:- Indirect Bilirubin (mg/dl)              =             Total Bilirubin – Direct Bilirubin =             1.146 – 0.7 =             0.446 mg/dl Or                      =             0.446 X 17.1 µmol/L =             7.62 µmol/L Normal Value:-    Indirect Bilirubin (mg/dl)        =         0.3  – 0.9 mg/dl

Microbiology, Uncategorized

Introduction of microbiology

“Microbiology Worlds”  Microbiology is the scientific study of microorganisms, which are microscopic living organisms that include bacteria, viruses, fungi, and protozoa. These microorganisms play a crucial role in various biological processes and have a significant impact on human health, agriculture, industry, and the environment. French chemist and Microbiologist Louis Pasteur (1822-1895) coined the term “microbiology”. He used the term to describe his work with organisms at the microscopic level. The field of microbiology has a rich history that spans several centuries, with important discoveries and developments contributing to our understanding of the microbial world. Historical Background of Microbiology:- 1.0Aristotle (384-322 BC) The concept of spontaneous generation was proposed by various ancient civilizations and philosophers, including the ancient Egyptians and Greeks. One of the most notable proponents of spontaneous generation in ancient times was the Greek philosopher Aristotle. He proposed the idea that certain animals, insects, and even mice could arisespontaneously from decaying organic matter. In the Middle Ages, spontaneous generation was further supported by prominent figures such as Avicenna and Albertus Magnus. 2.0 Antonvan Leeuwenhoek (1632 – 1723):- Anton van Leeuwenhoek made significant contributions to the field of microbiology, earning him the title of the “father of microbiology & Protozoology.” Here are some of his key contributions:-       1. Discovery of Microorganisms:  In the 17th century, Leeuwenhoek designed powerful single-lens microscopes, enabling him to observe tiny organisms that were previously invisible to the human eye. He was the first to describe and document various microorganisms, including bacteria, protozoa, and othermicroscopic life forms.  In 1676 Observations of bacteria, which he called “animalcules,” provided crucial evidence against the theory of spontaneous generation.       2. Microscopic Studies of Biological Samples: Leeuwenhoek examined a wide range of biological samples, including water, dental plaque, and even his own feces.        3. Advancements in Microscopy: Leeuwenhoek’s innovative improvements to microscope design, including using high-quality lenses and precise grinding techniques, significantly enhanced the magnification and clarity of his observations.  4.The term “microbe”was first used by Sedillot in 1878. The word comes from the Greek words “mikros” meaning “small” and “bios” meaning “life”. It literally means “small life” or “microscopic life”. 3.0 Francesco Redi (1626-1697):- Francesco Redi was an Italian physician, naturalist, and poet who made significant contributions to the field of microbiology, particularly in the context of spontaneous generation, which was the widely held belief at the time, that living organisms could arise from non-living matter. Redi conducted a series of experiments that challenged this idea, providing evidence against spontaneous generation Francesco Redi experiments:- In 1668, Redi conducted a famous experiment to test the hypothesis that maggots (the larvae of flies) spontaneously generated from decaying meat.                                                He set up three groups of jars, each containing decaying meat. One group was left open, allowing flies to access the meat and lay eggs, another group was covered with gauze, preventing flies from touching the meat but allowing air to pass, and the third group was completely sealed.                                                                                                                          Redi observed that maggots only appeared in the open jars, where flies could accessthe meat, and not in the covered or sealed jars.                                                                        This experiment provided strong evidence against spontaneous generation, demonstrating that maggots only appeared when flies were able to lay their eggs on the decaying meat. 4.0 John Needham (1713 – 1781):-  In 1745, Needham conducted experiments where he heated nutrient broths and then sealed them in flasks. Afterward, he observed the growth of microorganisms in the sealed flasks and concluded that life could arise spontaneously from non-living matter. 5.0 Lazzaro Spallanzani (1729 – 1799)- Lazzaro Spallanzani Disproving Spontaneous Generation Theory and support Biogenesis Theory.  In 1765, Lazzaro Spallanzani conducted experiments where he boiled nutrient-rich broth in sealed containers, effectively sterilizing the broth. His experiments showed that no microorganisms grew in the sealed flasks, even after long periods, unless they were exposed to air.                                                                                                                                 This demonstrated that living organisms did not arise spontaneously but were introduced to the broth from the external environment. 6.0 Louis Pasteur (1822 – 1895):- Louis Pasteur made several significant contributions to the field of microbiology, , earning him the title of the “father of Medical microbiology.” He coined the term “microbiology”, Aerobic and Anaerobic. 1.Disproving Spontaneous Generation:  Pasteur conducted experiments that disproved the prevailing notion of spontaneous generation 2.Germ Theory of Disease:  Germ theory states that microorganisms are the cause of many diseases 3.Pasteurization: Pasteurization is a heat treatment process developed by Louis Pasteur to kill or deactivate harmful microorganisms in food and beverages, such as milk and wine. 4.Vaccination: He developed vaccines against several diseases, including rabies and anthrax. 5. Fermentation: Chemical process by which molecules such as glucose are broken down anaerobically. 7.0 John Tyndall: John Tyndall was a prominent 19th-century Irish physicist and naturalist who made significant contributions to the field of microbiology, particularly in the areas of sterilization. 1.   Tantalization:  Tyndall developed a process known as Tantalization, which involves intermittent sterilization through boiling, incubation, and re-boiling. This method was used to kill heat-resistant bacterial spores and became an important technique in microbiology for ensuring

Scroll to Top