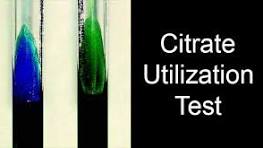
Author name: laxmienterprisesjnp@gmail.com

Biochemistry

VLDL AND LDL Cholesterol Test

Indirect method:- Fairly accurate determination of VLDL & LDL can be done for the values of cholesterol less than 400 mg/dl, by using the following formulae based on “The Friedewald equation”. Determine-    a) Total cholesterol    b) HDL- cholesterol and    c) T.G. Then calculate VLDL and LDL as follows: VLDL (mg/dl)                      =          Triglyceride/5 LDL-cholesterol (mg/dl)    =          Total Cholesterol – HDL – VLDL  Normal Value:- VLDL                =          2 – 38 mg/dl  LDL                  =          < 130 mg/dl Clinical Significance:- This test measures the amount of very low-density lipoprotein (VLDL) in your blood. VLDL cholesterol is a type of blood fat. It’s considered one of the “bad” forms of cholesterol, along with LDL cholesterol and triglycerides. This is because high levels cholesterol can clog your arteries and lead to a heart attack. High levels of LDL (low-density lipoprotein) cholesterol are associated with an increased risk of atherosclerosis, which can lead to other health conditions like stroke, coronary artery disease, and peripheral arterial disease

Histopathology

Histopathology & Cytology Practical Index

Practical index:-       1.    Safety guidelines of histopathology       2.    Important Histopathology Laboratory Instruments              a.      Microtome              b.      Wax Bath              c.       Slide Warmer              d.      Automatic Tissue Processor       3.    Sample Receiving and identification       4.    Gross Examination of Specimen       5.    Fixation (Merits, Demerits, and application) a.    Type of Fixative b.    Selection of fixative        6.     Dehydration        7.     Decalcification        8.     Clearing        9.     Impregnation       10.  Embedding and blocking       11. Trimming      12.  Section Cutting or Microtomy      13.  Slide Preparation      14. Staining of section slide a.     Routine H & E Stain b.     Special Stain      15. Mounting      16. Frozen Section processing      17. Museum Techniques a.     Preparation of Specimen b.     Storage of Specimen c.      Mounting of museum specimen

Laboratory instruments

Calorimeter Instruments Basics and Working

Calorimeter Principle,Components,Working & Applications:-  calorimeter:- A Colorimeter involves the measurement of Color and is the widely used method for finding the concentration of biochemical compounds. It Measures absorbance and wavelength between 400 to 700 nm (nanometer) i.e. from the visible spectrum of light of the electromagnetic spectrum. Absorption of light :- Light falling on a colored solution is either absorbed or transmitted. A colored solution absorbs all the colors of white light and selectively transmits only one color. This is its own color. PRINCIPLE OF COLORIMETER:-   A colorimeter is based on the photometric technique which states that When a beam of incident light of intensity I0 passes through a solution, a part of the incident light is reflected (Ir), a part is absorbed (Ia) and rest of the light is transmitted (It) Beer’s Law :-  This law states that the amount of light absorbed is directly proportional to the cocentration of the solute in the solution . Lambert’s Law:-  The Lambert’s law states that the amount of light absorbed is directly proportional to the length and thickness of the solution under analysis. In simplified form, The working principle of the colorimeter is based on Beer-Lambert’s law which states that the amount of light absorbed by a color solution is directly proportional to the concentration of the solution and the length of a light path through the solution.                                                     A ∝ cl Where, A = Absorbance / Optical density ofsolution c = Concentration of solution   l = Path length                                                 A = ∈cl     ∈ = Absorption coefficient PARTS OF COLORIMETER:- There are 5 essential parts in a calorimeter Light Source – The most common source of light used in colorimeter is a tungsten filament. Monochromator – To select the particular wavelength filter or monochromators are used to split the light from the light source.  Sample holder – Test tube or Cuvettes are used to hold the color solutions they are made up of Glass at the visible wavelength. Photo Detector System – when light falls on the detector system, an electric current is generated, this reflects the Galvanometer reading. Measuring device – The current from the detector is fed to the measuring device, the Galvanometer, shows the meter reading that is directly proportional to the intensity of light.   the formula used for determining the concentration of a substance in the test solution                                      A = ∈cl For two solutions i.e. Test and standard,            ∈ = Constant    l = Constant (using the same Cuvette or Standard cell)        AT = CT                ….. (i)        AS = CS               ….. (ii) From (i) & (ii),       AT × CS = AS × CT       CT = (AT/AS) × CS Where, CT = Concentration of the Test solution AT =Absorbance/ Optical density of the test solution CS =Concentration of the standard AS =Absorbance / Optical density of the standard solution

Histopathology

DECALCIFICATION

Introduction:- The presence of calcium salts in tissues makes them hard. This causes damage to the knife, difficulty in cutting tissue. Calcium is normally present in bones and teeth. Calcium may also be present in normal tissues in pathological conditions like necrotic tissue in tuberculosis. OBJECTIVES:- After reading this lesson, you will be able to: describe decalcification explain different methods of decalcification describe the chemical and physical tests to estimate the remaining calcium DECALCIFICATION:-

Fixation of Tissues
Uncategorized

FIXATION OF TISSUES

Introduction:- It is a process by which the cells or tissues are fixed in chemical and partly physical state so that they can withstand subsequent treatment with various reagents, with minimal distortion of morphology and no decomposition OBJECTIVES:- After reading this lesson, you will be able to:  *state the aims of fixation                                *explain the principle of fixation                      *describe the properties and factors affecting fixation                                                *explain types of fixation. AIMS OF FIXATION:- (a) To preserve the tissues as close to their living state as possible                        (b) To prevent autolysis and bacterial attack (c) To prevent tissues from changing their shape and size during processing       (d) To harden the tissues                             (e) To allow clear staining of sections subsequently                                                   (f) To improve the optical differentiation of cells & tissue. PRINCIPLE OF FIXATION:- Fixation results in denaturation and coagulation of protein in the tissues. The fixatives have a property of forming cross links between proteins, thereby forming a gel, keeping everything in their in vivo relation to each other.  PROPERTIES OF FIXATIVES AND FACTORS AFFECTING FIXATION:-1. Coagulation and precipitation of proteins in tissues.                                         2. Penetration rate differs with different fixatives depending on the molecular weight of the fixative                                      3. pH of fixatives – Satisfactory fixation occurs between pH 6 and 8. Outside this range, alteration in structure of cell may take place.                                              4. Temperature – Room temperature is alright for fixation. At high temperature there may be distortion of tissues.               5. Volume changes – Cell volume changes because of the membrane permeability and inhibition of respiration.   6. An ideal fixative should be cheap, nontoxic and non-inflammable. The tissues may be kept in the fixative for a long time.TYPE OF FIXATION:-*Immersion fixation *Perfusion fixation *Vapour fixation *Coating/Spray fixation *Freeze drying *Microwave fixation/StabilizationThe most commonly used technique is simple immersion of tissues/smears in an excess of fixative. For all practical purposes immersion fixatives are most useful. These may be divided into routine and special. SIMPLE FIXATIVES:-1. Formaldehyde: Commercially available solution contains 35%-40% gas by weight, called as formalin. Formaldehyde is commonly used as 4% solution, giving 10% formalin for tissue fixation. Formalin is most commonly used fixative. It is cheap, penetrates rapidly and does not over- harden the tissues. The primary action of formalin is to form additive compounds with proteins without precipitation. Formalin brings about fixation by converting the free amine groups to methylene derivatives If formalin is kept standing for a long time, a large amount of formic acid is formed due to oxidation of formaldehyde and this tends to form artefact which is seen as brown pigment in the tissues. To avoid this buffered formalin is used. 2. Absolute alcohol – it may be used as a fixative as it coagulates protein. Due to its dehydrating property it removes water too fast from the tissues and produces shrinkage of cells and distortion of morphology. It penetrates slowly and over-hardens the tissues.3. Acetone:-Sometimes it is used for the study of enzymes especially phosphatases and lipases. Disadvantages are the same as of alcohol. 4. Mercuric chloride:- It is a protein precipitant. However it causes great shrinkage of tissues hence seldom used alone. It gives brown colour to the tissues which needs to be removed by treatment with Iodine during dehydration. 5. Potassium dichromate:- It has a binding effect on protein similar to that of formalin. Following fixation with Potassium dichromate tissue must be well washed in running water before dehydration. 6. Osmic acid :- It is used for fixation of fatty tissues and nerves.7. Chromic acid:- It precipitates all proteins and preserves carbohydrates. Tissues fixed in chromic acid also require thorough washing with water before dehydration. 8. Osmium tetraoxide:- It gives excellent preservation of cellular details, hence used for electron-microscopy. 9. Picric acid – It precipitates proteins and combines with them to form picrates. Owing to its explosive nature when dry; it must be kept under a layer of water. Tissue fixed in picric acid also require thorough washing with water to remove colour. Tissue can not be kept in picric acid more than 24 hrs. COMPOUND FIXATIVES:- 1. Formal saline:-It is most widely used fixative. Tissue can be left in this for long period without excessive hardening or damage. Tissues fixed for a long time occasionally contain a pigment (formalin pigment). This may be removed in sections before staining by treatment with picric alcohol or 10% alcoholic solution of sodium hydroxide. The formation of this pigment can be prevented by neutralizing or buffering the formal saline.Fixation time – 24 hours at room temprature2. Formal calcium:-Useful for demonstration of phospholipids. Fixation time-24 hours at room temperature3. Zenker’s fluid:-It contains mercuric chloride, potassium-di-chromate, sodium sulphate and glacial acetic acid.Advantages :-even penetration, rapid fixationDisadvantages –After fixation the tissue must be washed in running water to remove excess dichromate. Mercury pigment must be removed with Lugol’s iodine.4. Zenker’s formal (Helly’s fluid):-In stock Zenker’s fluid, formalin is added instead of acetic acid.Advantages :- excellent microanatomical fixative especially for bone marrow, spleen & kidney.5. Bouins fluid :-It contains picric acid, glacial acetic acid and 40% formaldehyde.Advantages :-(a) Rapid and even penetration

Receiving of Surgical Specimens
Histopathology

RECEIVING OF SURGICAL SPECIMENS

INTRODUCTION:- In the laboratory setting, numerous histological specimens are received throughout the day for testing. Receiving of Surgical Specimens requires a systematic approach to ensure that all samples are properly accounted for and handled correctly. Without proper documentation and verification, there is a potential to misplace or lose samples. OBJECTIVES:-After reading this lesson, you will be able to:- *explain the process of receiving surgical specimens *describe preparation of gross room *receive the samples, label the sample and store.  RECEIVING OF SURGICAL SPECIMENS:- At the time of receiving the specimens, following points should be checked and  these points must match between requisition form and label on the sample container.1. Name of the patient 2. Sex and age of patient 3. Registration no, OPD or indoor number 4. Type of sample like appendix or lymph node. After matching the above points carefully, accession number of the Histopathology laboratory should be given on the requisition form and on the sample container like it has been depicted in the form and sample bottle. A register should be maintained for record and for future reference Following points should be noted on the register (sample given) 1.Date 2.Accession number which was given by the pathology department. 3.Patients name, age, sex. 4.Patients registration number/ OPD/ indoor number. 5.Type of sample. 6.Number of samples received from one patient. 7.Remarks / final diagnosis which may be entered later on. After receiving the samples the consultant should be informed for grossing. If grossing to be done after some time, fixative should be put in all the samples to prevent autolysis of the specimen. PREPARATION OF GROSS ROOM:-   The routine work associated with a surgical pathology specimen includes gross and microscopic examination. Proper preservation of tissues and processing of the tissue are the most important aspects for correct diagnosis. The size and features of the gross room depends on the number of specimens and type of institution. Gross room should be well illuminated and ventilated.It should have a gross station and racks to keep the specimen in order of accession number.        Gross station – It should have ventilated hood. 1. Cutting board placed inside the metal box designed in such a fashion that all the fluids should flow directly into the sink 2. Ready access to sink with hot & cold water 3. Formalin – stock and 10% buffered formalin 4. Box of instruments containing                 (a) Scissors                                                     (b) Forceps                                                     (c) Malleable probe                                       (d) Scalpel handle with disposable blades (e) Long knife                                                      (f) Scale                                                            (g) Pins for attaching the specimens to corked surface if required 5. Containers with different fixatives 6. Bone cutter 7. Large disposal bin 8. Box with cassettes and labels These are the essential items. Depending upon the pathology service being rendered to the institution more sophisticated items may be added. Apart from the above items following items may be of help in keeping the records 1. Photographic facility                                   2. Refrigerator                                                  3. Balance to weigh the gross specimen     4. X-ray view box 5. Other equipments for tissue bank facility.

Special Light Microscope
Histopathology, Uncategorized

special light microscope

Introduction:- Special Light Microscope refers to advanced microscopic techniques used to examine specimens that cannot be clearly observed under a simple compound microscope. Microscopes are instruments designed to produce magnified visual or photographic images of objects too small to be seen with the naked eye. A microscope must accomplish three tasks: produce a magnified image of the specimen, separate the details in the image, and render those details visible to the human eye or camera. Compound microscopes are suitable for examination of stained preparations, but for special conditions we require a Special Light Microscope such as dark-ground, phase contrast, polarizing, and immunofluorescence microscopes. Objectives of Special Light Microscope After reading this lesson, you will be able to:                                                     *describe the principle of Dark-ground, phase contrast, polarizing and immunofluorescence microscopy.                  *explain the uses of Dark-ground, phase contrast, polarizing and immunofluorescence microscopy. DARK GROUND ILLUMINATION:-                      Conditions arise when specimen need to be visualized as unstained or living cells. Since such specimens have refractive indices close to medium in which they are suspended, bright field microscopy is difficult as there is not much contrast. Principle:- Dark ground microscopy prevents direct light from entering the front of the objective, only light which enters is which gets reflected or diffracted by the specimen, thus making them appear bright in a dark background . Uses of Dark ground microscopy::- Useful for spirochaetes, flagellates, cell suspensions, flow cell techniques, parasites, autoradiography, and fluorescence microscopy. Disadvantage: Resolution is inferior to bright field microscopy. Does not reveal internal details PHASE CONTRAST MICROSCOPY:- Unstained and living biological material viewing by bright field and dark ground illumination has problems of reduced illumination and resolution. To overcome these problems, phase contrast microscopes are used. Principle: It is an optical microscopy illumination technique that converts phase shifts in light passing through a transparent specimen to brightness changes in the image. The phase shifts themselves are invisible to the human eye, but become visible when they are shown as brightness changes. A practical implementation of phase-contrast illumination consists of a phase ring (located in an aperture plane located somewhere behind the front lens element of the objective) and a matching annular ring, which is located in the conjugate primary aperture plane Two selected light rays, which are emitted from one point inside the lamp’s filament, are focused by the field lens exactly inside the opening of the condenser annular ring. Since this location is precisely in the front focal plane of the condenser, the two light rays are then refracted in such way that they exit the condenser as parallel rays. Assuming that the two rays in question are neither refracted nor diffracted in the specimen plane (location of microscope slide), they enter the objective as parallel rays. Since all parallel rays are focused in the back focal plane of the objective, the back focal plane is a conjugate aperture plane to the condenser’s front focal plane (also location of the condenser annulus). To complete the phase setup, a phase plate is positioned inside the back focal plane in annulus Uses: It’s a quick and efficient way of examining unstained paraffin, resin and frozen sections, studying living cells (cell cultures) and their behavior. POLARIZED LIGHT MICROSCOPY:- Light can be described as an electromagnetic vibration where there are many planes of vibration. Natural light vibrates in many planes or directions, whereas polarized light vibrates in only one plane. It can be produced by passing light through a polarizer. Substances capable of producing polarized light are called birefringent. Principle: The dedicated polarizing microscope uses two polarizers. One, always referred to as polarizer, is placed beneath the substage condenser. The other is called analyzer and is placed between the objective and the eyepiece. Looking through both polarizers, the light intensity is best when they are both giving light vibrating parallel to each other. However, when the light vibration is at right angles to each other, there is dark background. If a substance capable of birefringence is placed between the two polarisers it gets visualized as brightness against a black background. Uses: Medicine-Amyloid detection, collagen fibers, urates and other crystals.Metallurgy, Ceramics. FLUORESCENCE MICROSCOPY:- Principle: Fluorescence is the property of some substances which, when illuminated by light of a certain wavelength, will re-emit the light at a longer wavelength. In fluorescence microscopy, the exciting radiation is usually ultra violet wavelength or blue region. A substance which possesses a fluorophore will fluoresce naturally (Primary or autofluorescence) eg Vitamin A, chlorophyll Dyes, chemicals and antibodies added to tissues produce secondary fluorescence of structures and are called fluorochromes. When antibodies labeled with fluorochromes are used to detect particular antigens, the technique is called Immunofluorescent technique and is widely used in medicine. Tissue antigens most commonly demonstrable by Immunofluorescence are viruses, protozoa, bacteria, enzymes, hormones, plasma proteins, cells and cell constituents. Examples of fluorochromes: Fluorescein (apple green emission color), Rhodamine (Orange-red color

Light Microscope
Histopathology

Light microscope

Introduction:- Light Microscope instruments are designed to produce magnified visual or photographic images of objects too small to be seen with the naked eye. The Light Microscope must accomplish three tasks: produce a magnified image of the specimen, separate the details in the image, and render the details visible to the human eye or camera. This group of instruments includes not only multiple-lens (compound Light Microscopes) designs with objectives and condensers, but also very simple single lens instruments that are often hand-held, such as a loupe or magnifying glass. Objectives of Light Microscope Study After reading this lesson, you will be able to: *describe the principle of light microscope *explain the parts of a light microscope *learn how to use a microscope.LIGHT AND ITS PROPERTIES:- Light radiates in all directions, with each ray traveling straight till infinity, unless Amplitude:- refers to the strength of energy or brightness of light. When light passes through any medium, the amplitude decreases depending upon the medium. Wavelength:- The distance between the apex of one wave and the next is the wavelength and measured in nanometers, and determines the color. Retardation:- Media through which light is able to pass, will slow down the speed of light (proportionate to density of medium). Refraction:- If light enters a medium (eg glass) at an angle, a deviation of direction occurs Image Formation .                                                                                                                                       Focal point:- Parallel rays entering a simple lens are brought together to a single point called focal point, where a clear image will be formed. Conjugate foci:– Object placed at one end of lens will form a clear image on a screen kept at other side of lens. Conjugate foci vary in position. If object is nearer the lens, the image will be formed further away, at a greater magnification and inverted. This “real” image is formed by objective lens of microscope. If the object is placed within focal point of lens, image is formed on same side as object, is enlarged, right way up and cannot be projected on a screen, this is the “virtual image”. The eye piece of microscope forms this image Image Quality:- As white light is composed of all spectral colors, different wavelengths will be refracted to different extent. This lens defect is called chromatic aberration.Spherical aberration is caused when light rays entering at a periphery are refracted more than those entering the centre of lens. Both these faults can be corrected by using combination of lenses and lens elements. COMPONENTS OF A MICROSCOPE:- Light source:- Light source can be external or inbuilt. Dispersal of heat, collection of greatest amout of light, direction and distance are carefully calculated by the designers of microscope for greatest efficiency.   Condensers:-                                                                                      The purpose of condenser is to concentrate the light into the plane of the object. The more the light at the specimen, better is its resolution. All condensers have aperture diaphragm with which the diameter of the light beam can be controlled.                Object stage :-                                                                                    It is a rigid platform with an aperture through which the light can pass. It supports the glass slide. It allows controlled movement in two directions.                                                   Objectives :-                                                                                           They are the most important parts of microscope. The main task of objective is to collect the maximum amount of light from the object, unite it and form a high quality magnified real image. Magnifying powers of objectives are from 1:1 to 100:1.                                                                                               Body tube:- Body tube can be monocular, binocular and the combine photo-binocular (also called trinocular). Binocular tubes have provision for inter-pupillary distance adjustment, enabling each observer to adjust for his eyes.                                                            Eyepiece:-                                                                                             The final stage in optical path, the eyepiece’s function is to magnify the image formed by the objective within the body tube, and present the eye with a virtual image.                                           Use of the Microscope:-                       

Histopathology, Uncategorized

Introduction of histopathology

Introduction:- Surgical pathology includes gross and microscopic examination of resected specimens and biopsies by histopathologists for tissue diagnosis. Several steps are followed to get the tissue in a form, by which diagnosis can be made under light microscope Objective:- After reading this lesson, you will be able to: list the steps involved in the processing of surgical specimens for histopathologic examination explain the after care of the specimens explain grossing and gross room describe the laboratory hazards and safety measures. Steps involved in the process are 1. Receipt of specimens from OT 2. Grossing 3. Tissue processing 4. Embedding 5. Section cutting 6. Staining and labelling 7.   Dispatch of slides to pathologist for diagnosis

Scroll to Top